 |
Creating the Ultimate Off-road Auto Shifter By Bill "BillaVista" Ansell |
AcknowledgementsThe author would like to acknowledge the kind assistance and creative ideas of Chris Durham, Dustin Webster, and Adrian Weber. IntroductionThe fact of the matter is, nobody makes a commercial, off-the-shelf (COTS) automatic tranny shifter that is ideal for serious off-road use. That’s hardly surprising since one of the key requirements for a hardcore off-road shifter is the complete opposite of what anyone would want for street or drag racing use. That requirement is the ability to shift quickly and reliably to reverse from any forward gear. In an off-road rig, this requirement is driven by the need to “back out” of a failed climb attempt. Imagine you launch up a steep obstacle, but the front end gets light and you quickly find yourself at risk of going over backwards. Sometimes a bump to neutral will be enough to save you from a backwards roll, but if the climb is steep and fast enough, nothing short of an instant shift to reverse will save you from rolling over backwards. |
 |
Now, you can imagine that whether you are driving in traffic or ripping down the ¼ mile track at 200mph, the very last thing you would ever want to do would be to shift from a forward gear to reverse. And this is precisely what virtually all COTS shifters are designed to prevent – a sudden or undesired shift from forward gear to reverse. In fact, most sanctioning bodies, such as NHRA/IHRA have explicit requirements that require shifters to have a “reverse lockout feature”, a feature designed into the shifter specifically to make shifting to reverse something of a complicated affair. Hardly ideal for us when you’re about to turn turtle. Since the street and strip crowd are so much larger and more established than we are, manufacturer’s have understandably chosen to design and manufacture shifters with their needs in mind. This leaves we hardcore ‘wheelers in a familiar predicament – it’s up to us to re-design / adapt / modify available products to suit our needs. This article illustrates how I chose to do just this in order to turn an ordinary B&M drag racing competition Magnum Grip Pro Stick shifter into the ultimate hardcore off-road shifter. I expect the same ideas could easily be adapted to modify other models or brands of shifters, but before we get to the specifics, a few words about choosing the best “base” shifter for your needs is in order. The following discussion is based around a 3-speed automatic, but the principles remain the same when applied to one with more or fewer gears. Shifter OptionsWhich brand and model you choose as the “best” shifter for your driving needs will depend on the following factors: Valve Body (automatic, manual, or manual/automatic)An automatic valve body (as found in many stock transmissions) shifts automatically. In many cases, this is true regardless of shifter position (i.e. even with the shifter in 1, at a certain RPM the tranny will shift to 2). For obvious reasons this type of valve body is less desirable for a hardcore off-road rig. Choice of shifter with this type of valve body is less important than with others, as it will likely spend much of its life in D. A manual valve body (MVB) is the complete opposite – it will never shift unless the shifter is moved. It’s a bit like a clutch-less manual transmission in this respect. Developed for drag racing, these are also popular in off-road rigs. Choice of shifter with an MVB is very important as this type will be shifted the most. Particularly important will be how it shifts up and down between the forward gears. A manual/automatic valve body (A/M VB) is something of a compromise between the two. Available in some stock transmissions, many aftermarket transmissions, and also in kit form to convert a stock transmission; these units offer some of the advantages of both an automatic and a manual valve body. Typically, in a transmission with an A/M VB, when the shifter is in the 1 or 2 position, the transmission will hold that gear regardless of RPM or other conditions. However, when the shifter is placed in D, it will shift automatically up and down through the gears. This type of VB is a good choice for many rigs, particularly those that see multi-use. Choice of shifter with an A/M VB is almost as important as it is with an MVB. In both cases, that choice is heavily dependent on the shift pattern used in the valve body. Valve Body Shift Pattern (forward or reverse)A forward shift pattern (FSP) is found in all stock transmissions. With an FSP, gear selection is, in order: P R N D 2 1. A reverse shift pattern (RSP) is frequently found in MVB equipped transmissions but, depending on the particular transmission, either pattern can be used with any valve body. Developed for drag racing use, the RSP is, in order: P R N 1 2 D. A moment’s reflection should make the reason clear. Starting out on the line in 1, the drag racer can slam through the gears as he blazes down the track with no fear of over-shifting into N or R at 200mph. If a forward pattern were used, it might be possible to over-shift from 2nd to N or R which would end your race at the very least! Drag use is the reason MVB’s with Reverse Patterns are so common, the combination often referred to as a “Reverse Manual Valve Body” or RMVB. The same combination is also popular with many off-road rigs. Anticipated Launch GearThe anticipated launch gear is that gear which you most often find yourself using when launching up an obstacle where you might possibly have to avoid the dreaded back-flip roll by quickly hitting reverse. It is a defining factor of which shift pattern is best for you. Obviously, that gear depends on the performance characteristics of your rig - including power-to-weight ratio, traction, overall gearing, torque converter stall, and many others. It also depends on the type of VB you are using. In terms of how it affects shifter pattern, the choice essentially boils down to “are you most often going to launch a climb assault in 1st gear or D?” If the answer is 1st gear, a reverse pattern might be your best choice as it places 1st, your launch gear, closest to R. If the answer is D, as it might be with an A/M VB, then a forward shift pattern might be best. Ideally, the ultimate off-road shifter should allow quick easy shifts to R from ANY forward gear as circumstances could always dictate that you are launching in 1 or 2 or D. Personal Preference – look & feel.Don’t kid yourself that it’s not important. Even if you don’t care how it looks, the particular feel of any given shifter is going to have a huge effect on the driveability of your rig. Put bluntly – sucky shifters suck. Personal preference plays a large role here. There is a very popular brand of shifter that I simply can’t stand the feel of (as I don’t like horizontal gates) nor the look of, with its goofy hexagonal shaft and video-game joystick style knob. To each his own, as they say! Rig Interior LayoutApart from ergonomic factors, the concern here is whether your layout allows or demands a cable shifter or solid shift linkage, and whether your chosen shifter can accommodate that. Switch RequirementsSome rigs will have a need for shifter-mounted switches. They may be internal: such as a backup switch (to illuminate reverse lights) or neutral safety switch (to prevent starting unless the transmission is in P or N). Or they may be external, such as a shifter-handle mounted actuator button for something like nitrous or a locker. Again, consider your needs and make sure your chosen shifter can accommodate them. Against each of these factors you must evaluate the specs of any shifter you consider – whether or not you intend to modify it to better suit your needs. Shifting StyleThere are a huge variety of shifters available on the market with virtually any combination of features possible (except the quick reverse action we need – but we’ll get to that). As just about any combination of minor features is available with any style shifter (such as handle style, switches, material, etc); the most important feature of any shifter is the shifting style. There are four basic styles of shifting. Most shifter will use one of them. They are:
The gateless shifter is the simplest and cheapest design. As the name implies, it has no “gates” for the shift lever to navigate nor detents for the lever to rest in once a gear is selected. It relies entirely on the transmissions internal shift detent lever and spring to hold the lever in the selected gear. It has the advantage that it is cheap, will work with any transmission, VB, or shift pattern, and will obviously allow that important shift from any fwd gear to Reverse. The disadvantage include a lack of any switches as well as being much easier to miss shifts or over-shift with. The look and feel is also not as nice as many of the more feature-rich shifters either. The ratchet shifter is one in which you can shift “normally” by moving the stick, or you can place the lever in a position, normally D, and “ratchet shift” up and down through the gears by bumping the shifter and having it return to centre via a spring-loaded action. At first glance it seems like a great idea and the best of both worlds. In practice, especially for off-road use, it usually isn’t. Say you’re in ratchet mode 1st gear, to get to R in a panic you would have to shift the lever 4 times!! Add to that the fact that with most, the procedure to get out of ratchet mode is convoluted and complex and you end up with a shifter you don’t want to be in ratchet mode with. And if you don’t want to be in ratchet mode, why would you want a ratcheting shifter? Horizontal gate shifters have, as the name implies, a horizontal plate into which the shift gate pattern is carved. Lateral spring pressure is normally used to keep the shift lever in place in the gates. This pressure must be overcome by the operator who shifts by pulling the stick to the side and then “rowing” through the gates to the desired shifter position. Gates can normally be modified or replaced, though sometimes not easily. The choice between this style and the vertical gate style described below comes down to a largely personal preference decision based on look and feel. Personally, I don’t like horizontal gate shifters at all. The vertical gate shifter has a spring-loaded, lever actuated “stopper” mechanism that is used to disengage and engage the various shift gates cut into a vertical plate mounted on the side of the shifter. Like the horizontal gate shifter, spring tension is used to keep the shifter “locked” into a position until the operator wants to shift. The difference is, instead of moving the stick side-to-side to enable shifting, some sort of trigger or lever mechanism is used. Sometimes slightly oddball implementations are used, such as sticks that must be pulled up. My personal preference is for a trigger-grip lever, as seen below. Reverse Lockout LeversOne last word on shifter characteristics before we move on – reverse lockout levers. Almost all unmodified COTS shifters have some sort of “reverse lockout” function built-in as a sort of “safety device”. The intent being to prevent accidental shifts into R. The problem is – this same mechanism also serves to inhibit our all-important panic-shift into R. You’re unlikely to find a quality shifter without one, so if your goal is the ultimate off-road shifter - you’re going to have to modify or disable it. Make sure you can do so without destroying the shifter before buying! The Ultimate ShifterSo, speaking of the ultimate shifter, after all that theory, what would the ultimate off-road shifter look like, if it were available? The ultimate shifter for an off-road rig, in my opinion, would have the following characteristics:
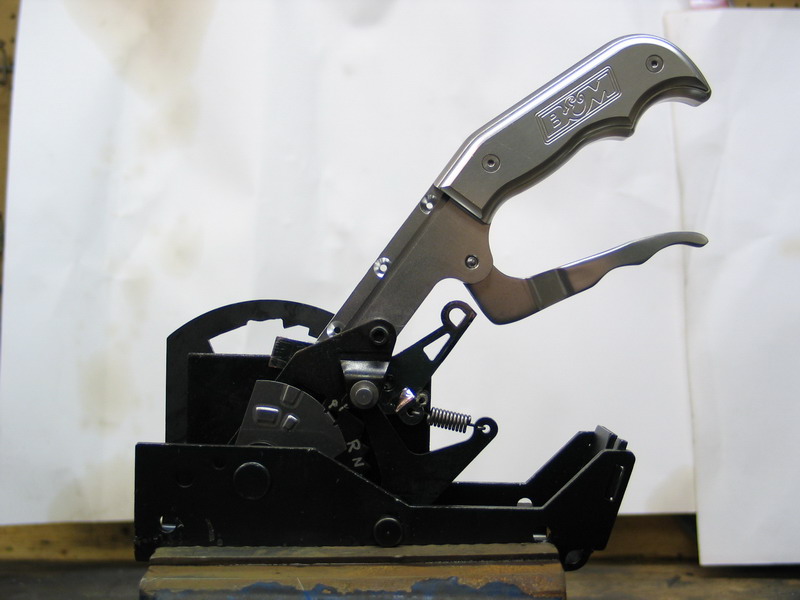
Since no such animal exists – I had to modify a stock shifter to achieve my goals. Before I illustrate the modifications, here’s a quick look at the “base” shifter I chose. I have been asked why it is that the ability to quickly and easily visually verify which gear the shifter is in, is not on my list. My answer is this: I used to be the king of labels...labels and pointers and arrows on everything. But, I have learned that, in order to drive well, you need to be one with the machine and have everything positioned and functioning so that you don't have to look. Hands on the controls, eyes on the obstacle is my new motto. My current Operator-Machine Interface (OMI) philosophy is that "if you have to look, you've buggered up the design" Stock B&M Magnum Grip Pro Stick ShifterIt’s a B&M Racing, Magnum Grip Pro Stick, with the following advertised features: * Reverse lockout feature meets NHRA/IHRA requirements. Like any commercial shifter, it fails the first three criteria for the ultimate off-road shifter, but it does meet the next six. I will simply need to modify so that it passes numbers one to three, without cocking up any of the others, especially number four. Let’s take a look at how the unmodified stock unit works and then I’ll show you how I did just that. |
|
|
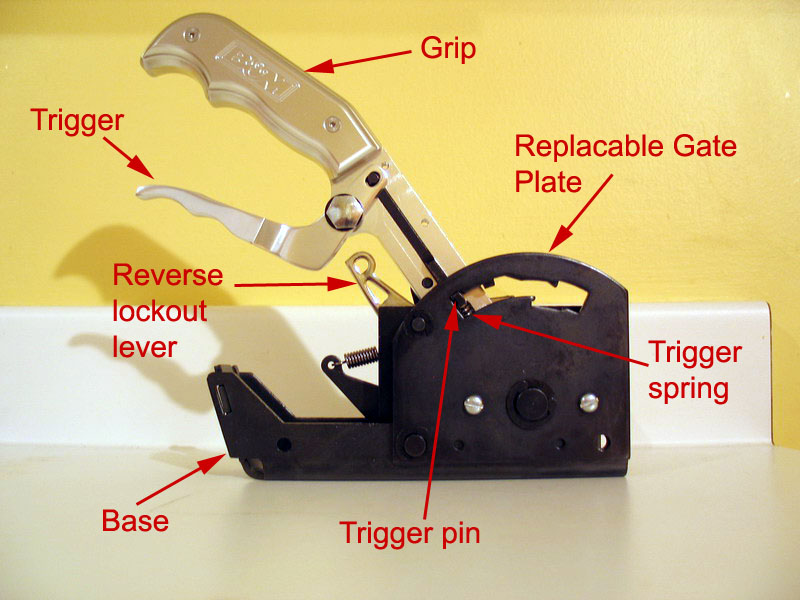
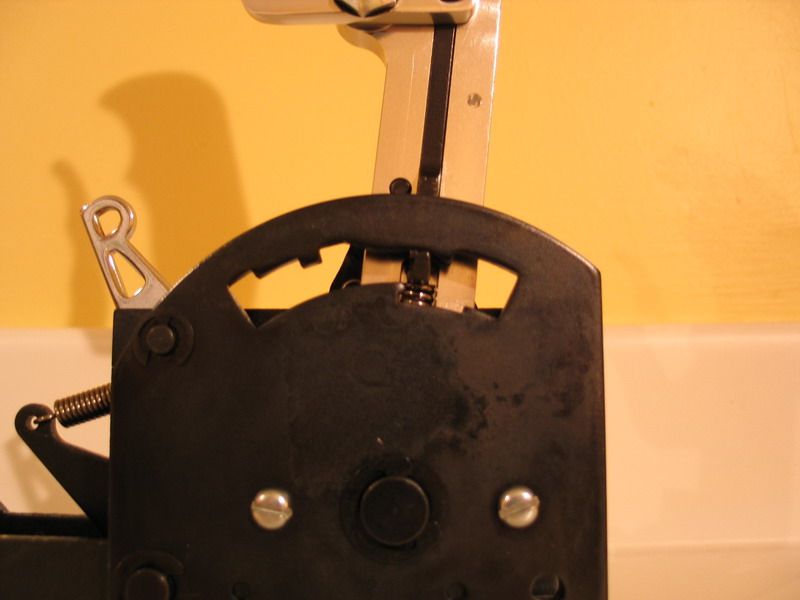
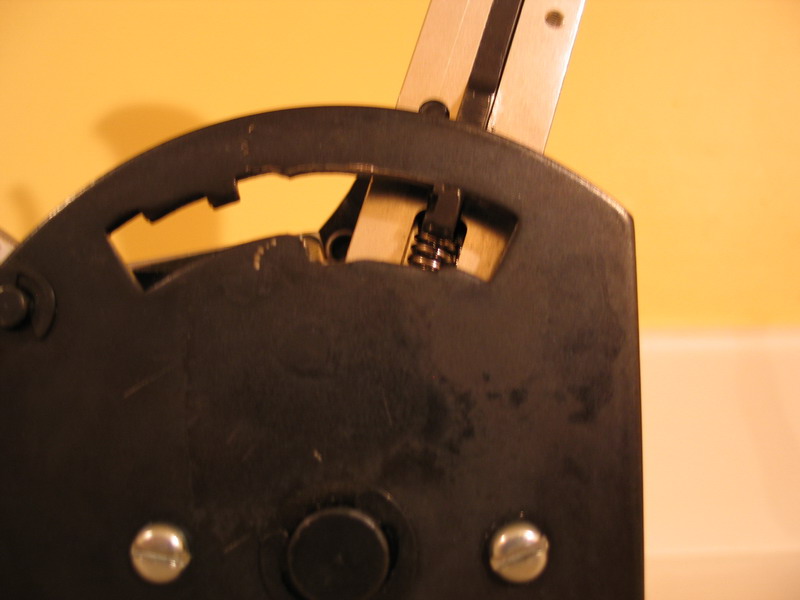
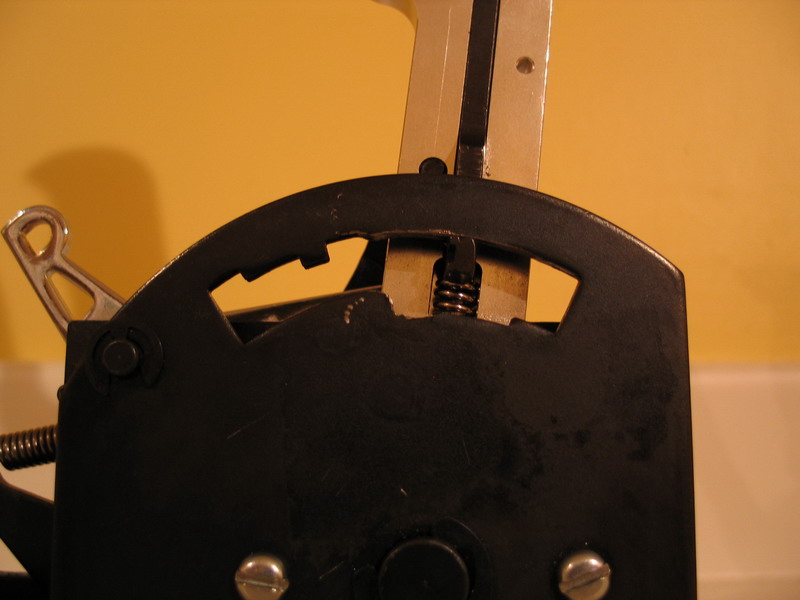
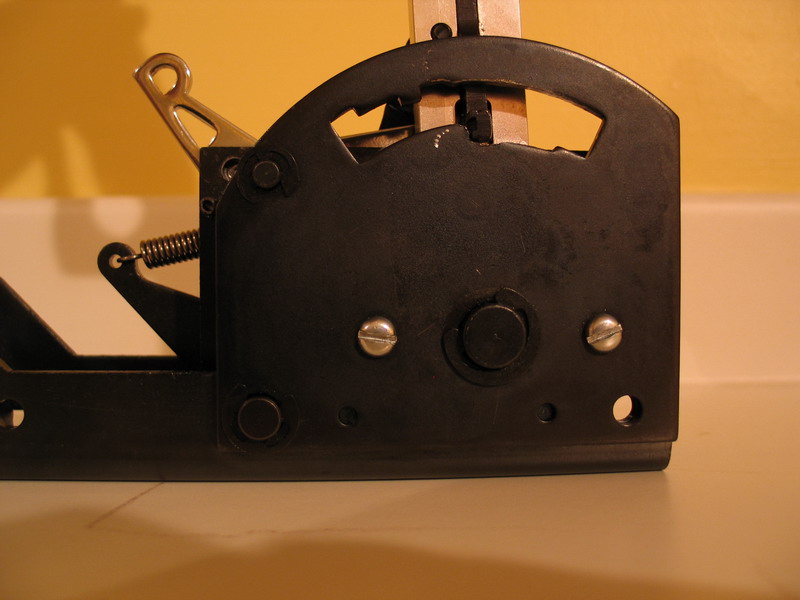
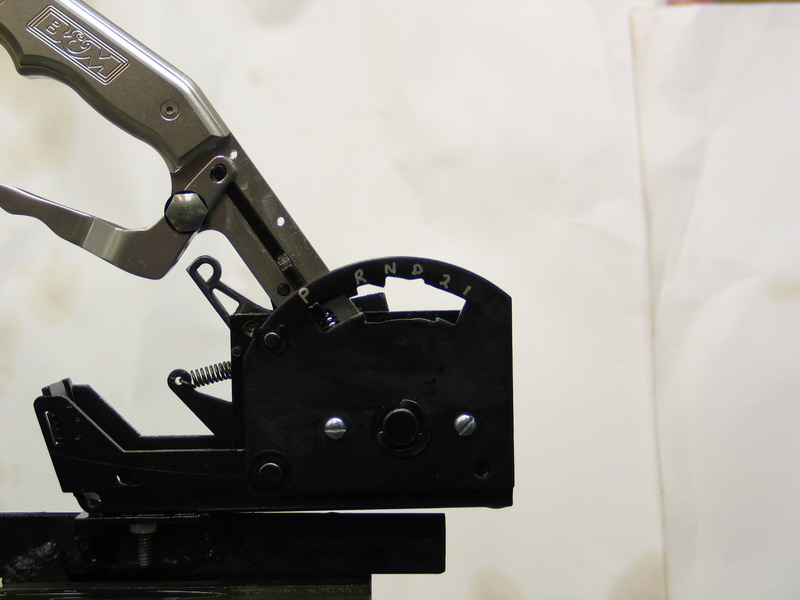
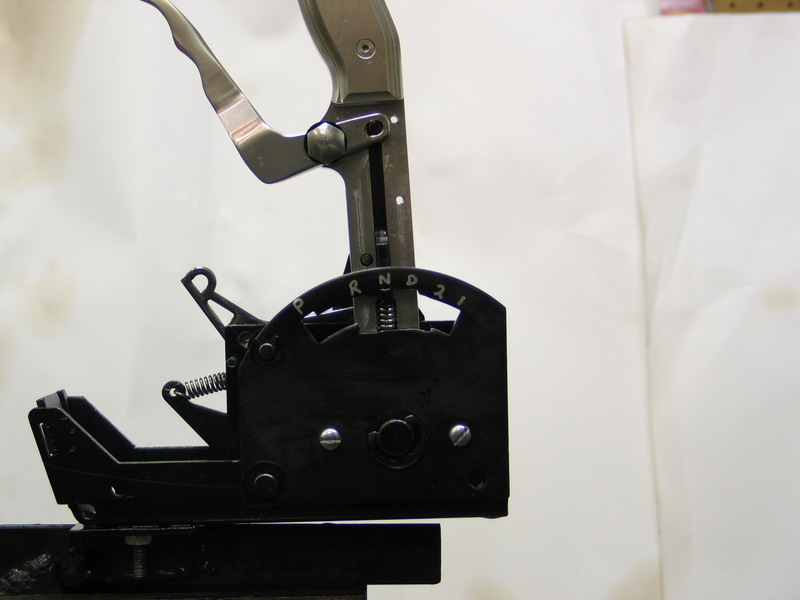
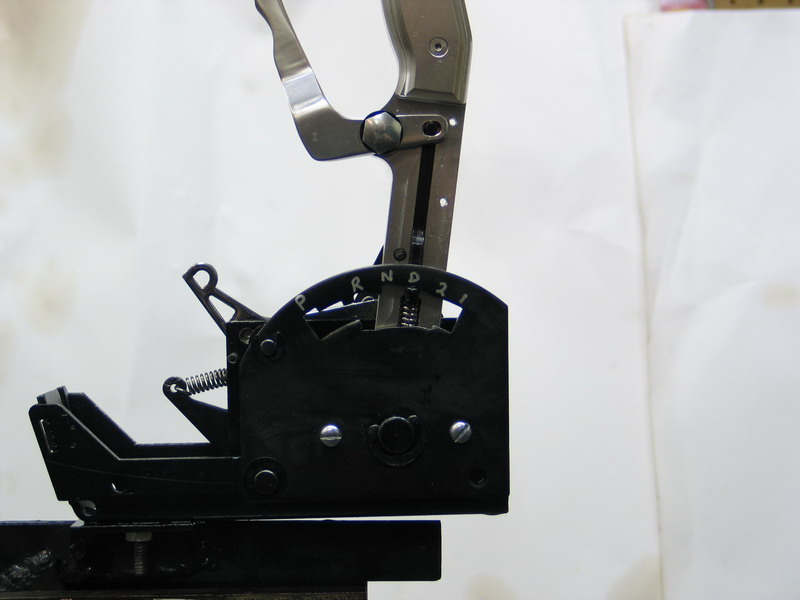
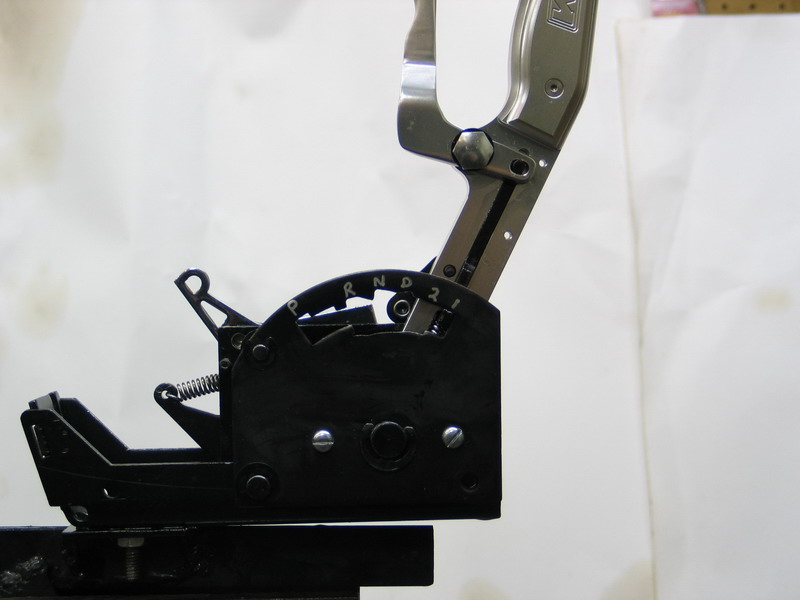
This is the left side of the shifter, shown in the park position. You can see the replaceable gate plate with the stock gates. Note how the spring-loaded trigger pin engages the gates. To shift, the driver pulls the trigger, compressing the trigger spring, and releasing the trigger pin from the gate. |
||||
|
|||||
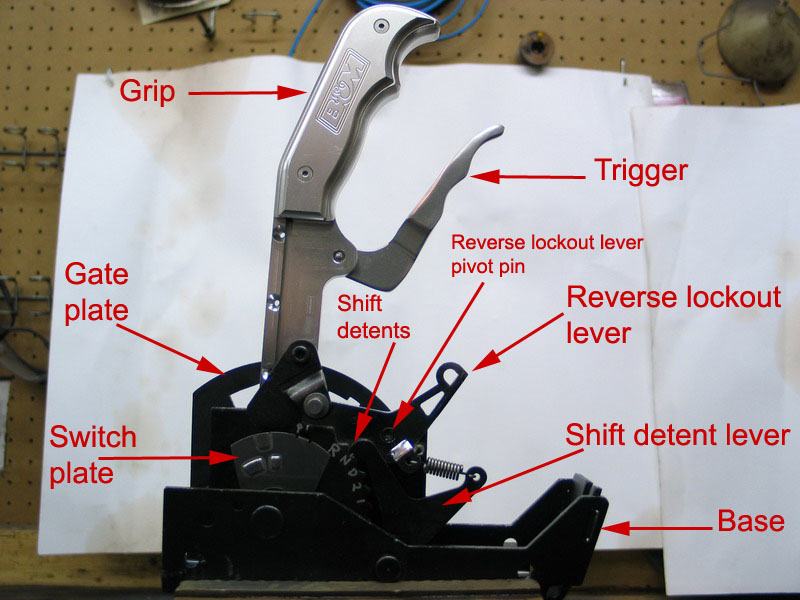 |
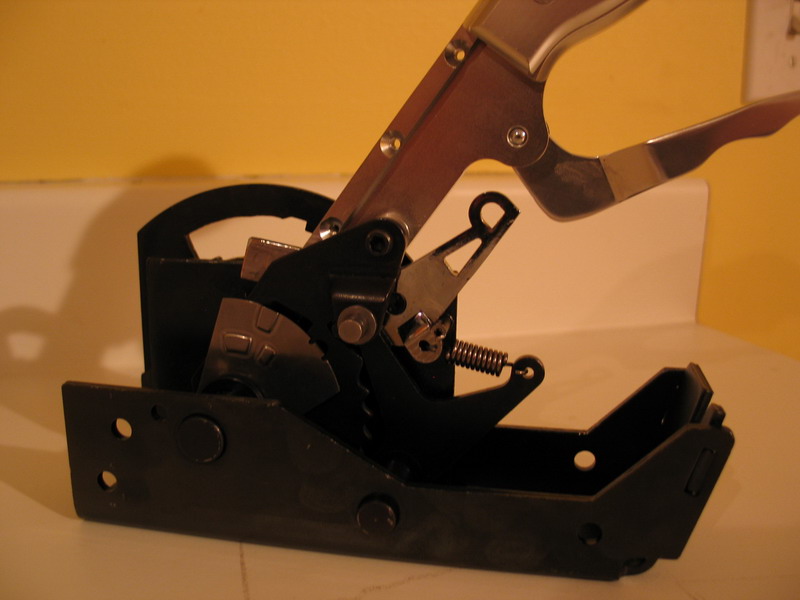
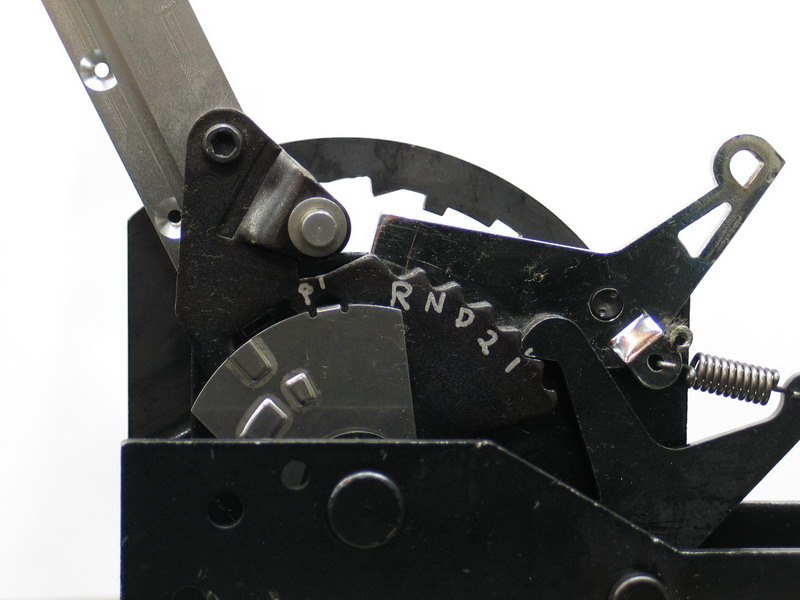
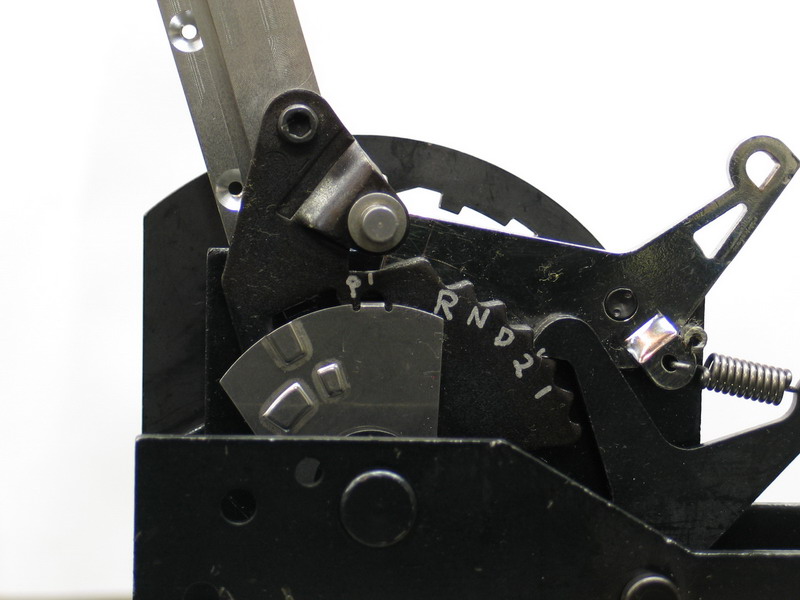
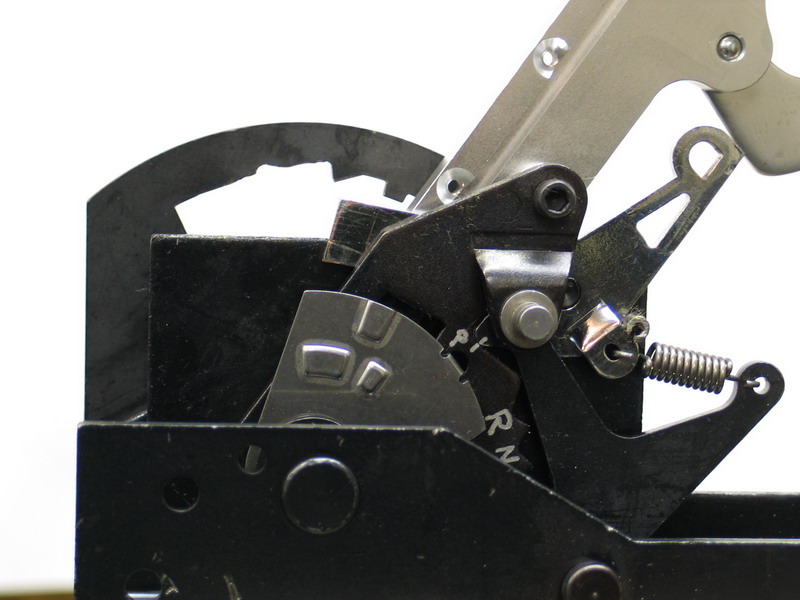
This is the right side of the shifter in the neutral position. The switch plate is where you can mount a reverse neutral switch and backup switch to the shifter. Note the arrangement of the shift detent lever and the shift detents. The shift position labels were added by me with a silver Sharpie marker, and are labelled for a 3-speed forward shift pattern. The spring attached to the detent lever pulls the lever into contact with the detents at all times. As such, even if there were no gates on the other side, the shifter would "click" from position to position. Note also the reverse lockout lever and the reverse lockout lever pivot pin. |
||||
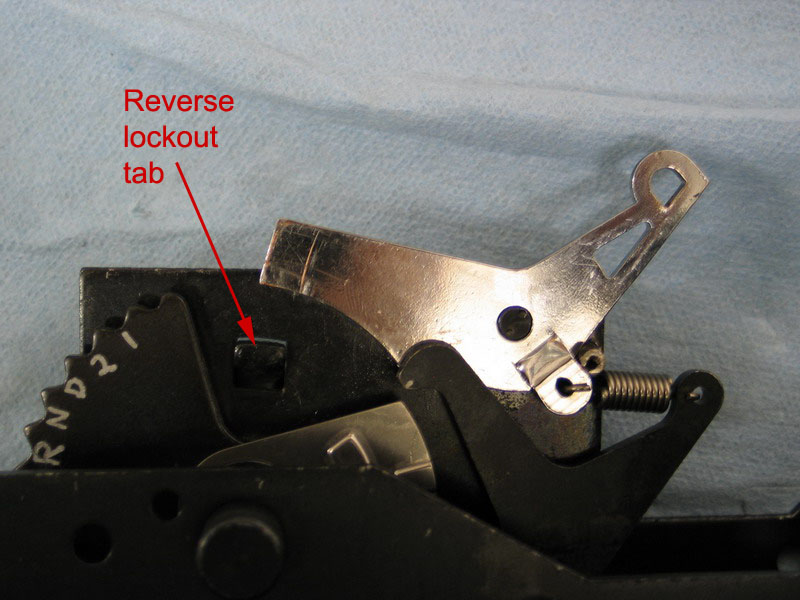 |
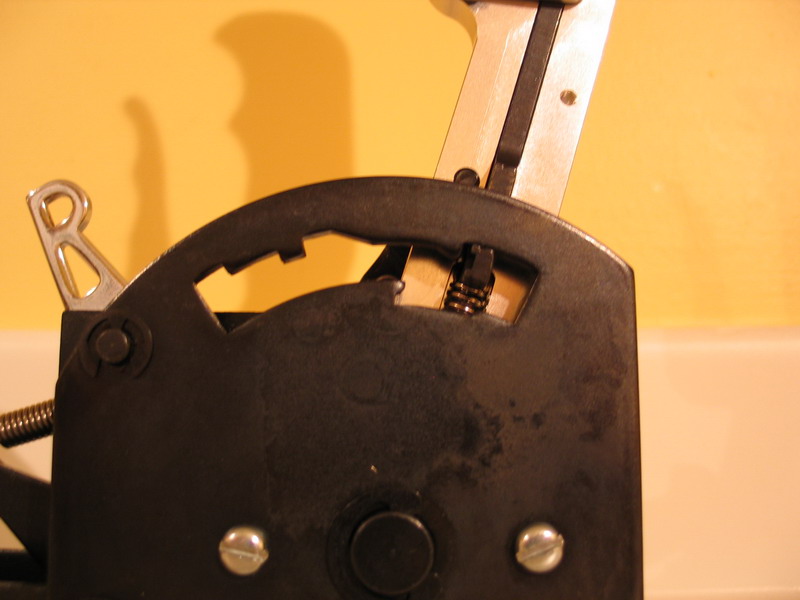
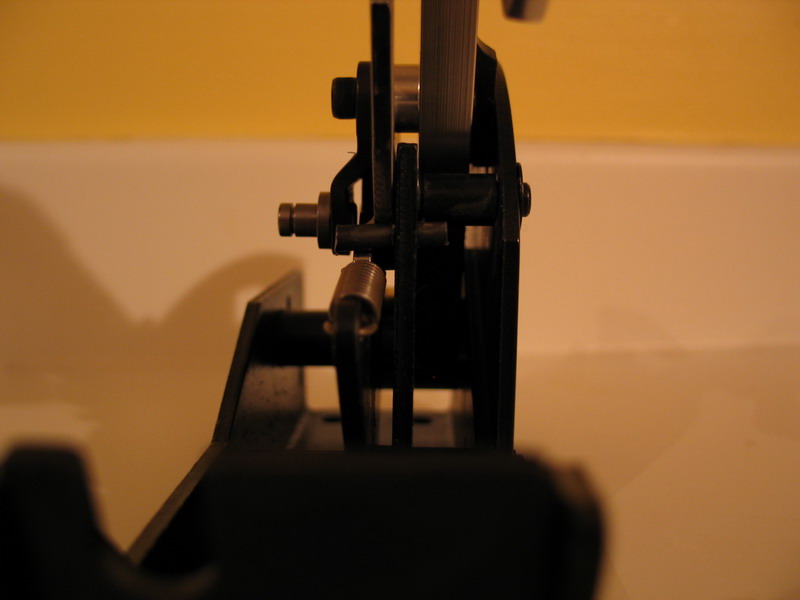
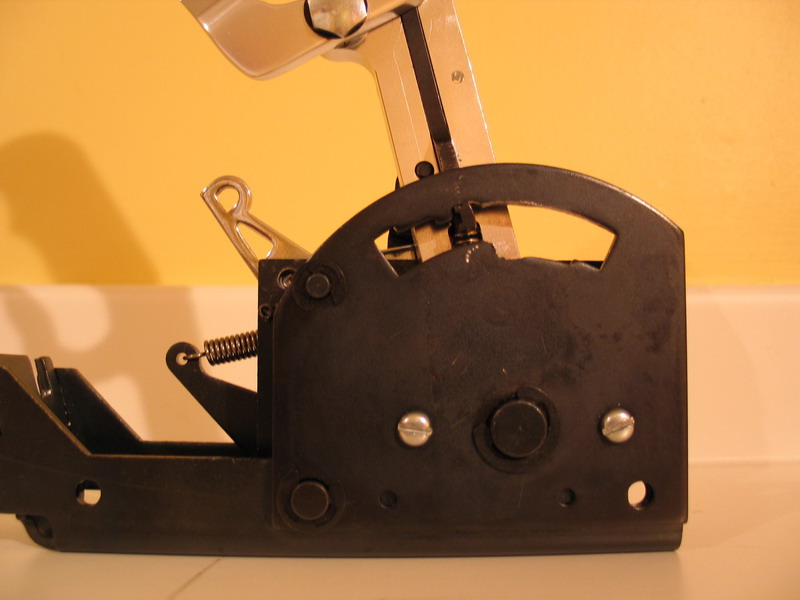
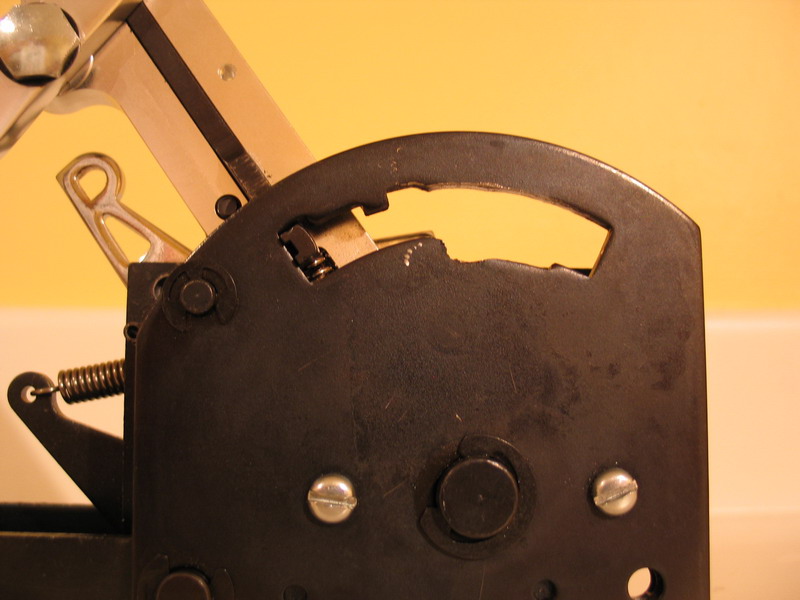
In normal operation, as the shifter is moved forwards towards park, the back end of the reverse lockout lever engages the tab shown here. This prevents the shifter from being moved further forward into park until the reverse lockout lever is pushed forward. In normal operation, the reverse lockout lever is pushed forwards, rotating on the pivot pin, and disengaging the tab so the shifter can be moved all the way forwards into park.
|
||||
The following are the stock shifter shifting instructions that come with the product: THREE SPEED FORWARD PATTERN (SEE FIGURE #12) The following pics illustrate the shifter positions and the trigger pin positions in the stock gates as the shifter is moved through all the gears from P to 1. |
|||||
 |
Park. | ||||
 |
Reverse. | ||||
 |
Neutral. | ||||
 |
Drive. | ||||
 |
Second. | ||||
 |
First. | ||||
Modifying the ShifterDisabling the Reverse Lockout |
|||||
 |
The first order of business is to disable the reverse lockout feature. There are several ways to accomplish this. You could disassemble the shifter and flatten or grind off the tab. You could also cut the end off the reverse lockout lever so that it doesn't engage the tab. However, I wanted a modification that would work, be reliable, but be completely reversible. As such, I chose to hold the reverse lockout lever forward into the "disengaged" position, and then drilled a hole through its mounting plate and inserted a dowel pin to hold it permanently in this position. |
||||
 |
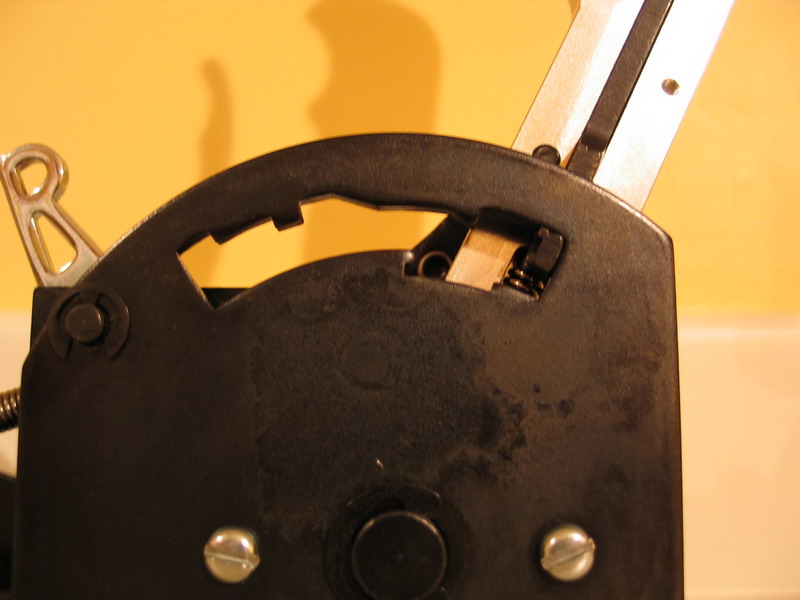
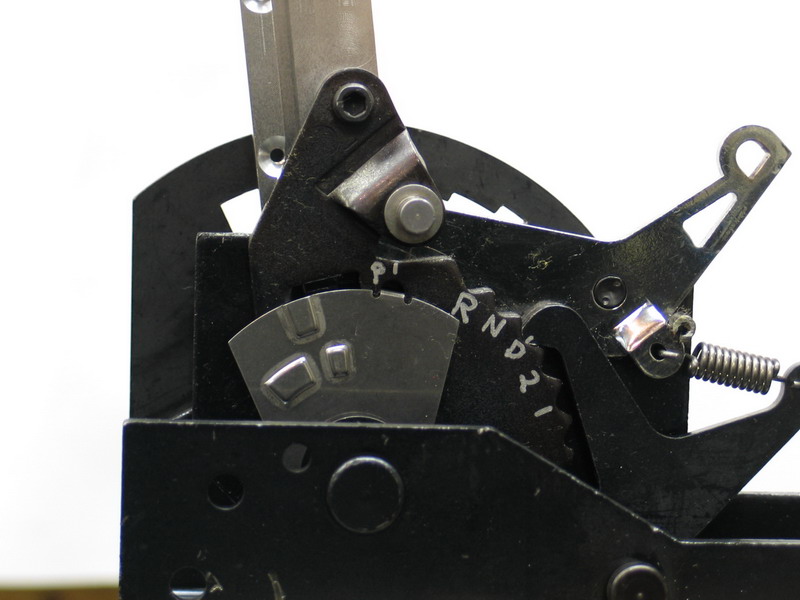
Here you can see the lever in the disengaged position, the back end of the lever clear of the tab, and the dowel pin holding it in this position. The pin engages the small tab on the reverse lockout lever into which the detent spring inserts. This way the lever can;t rotate back into position to engage the tab and prevent shifting into reverse.
|
||||
 |
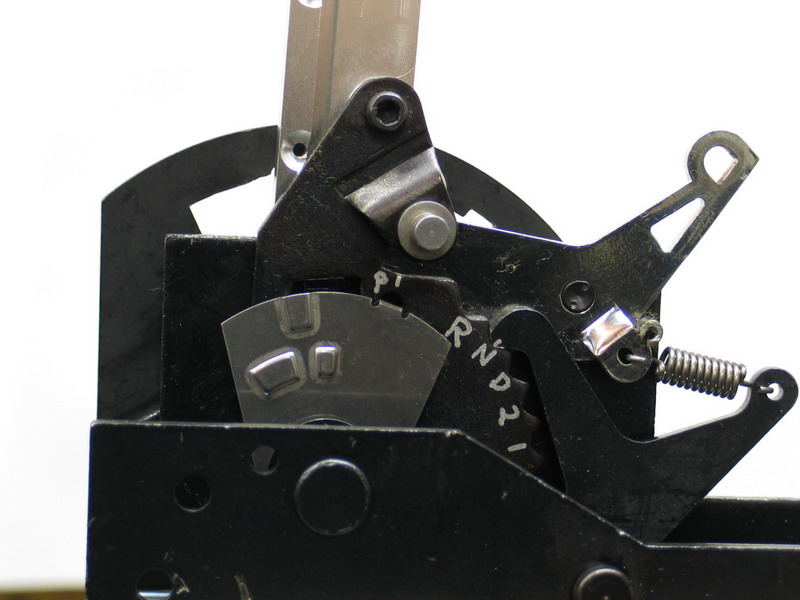
Because the detent spring attaches to the tab on the lockout lever, when you push the lockout lever forward (or indeed if you permanently hold the lever in the forward position as I have here) you stretch the detent spring a little, slightly increasing the pressure holding the shift detent lever against the detents. This can be a helpful secondary consequence of this modification, particularly if you plan on cutting out the gates between the shift positions - it will make the shifts a little stiffer and more positive between gears, helping prevent over-shifting or accidental bumping of the lever out of gear. |
||||
 |
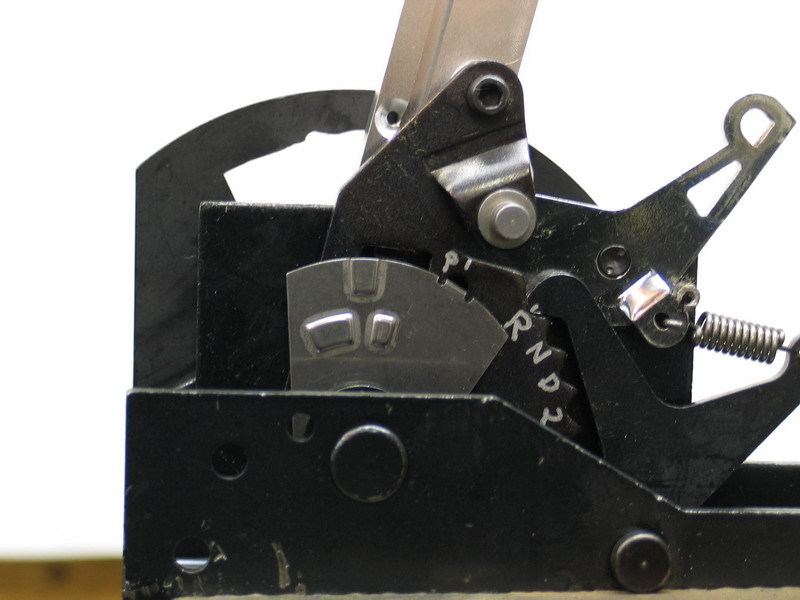
Front view of the installed pin. Now, if I ever wanted to use the shifter with the reverse lockout function intact, either in the current vehicle or a different car, I would only have to remove the pin. |
||||
Modifying the GatesEven with the reverse lockout disabled, there is still no way to quickly and easily shift from any forward gear to N or R with the stock gates. |
|||||
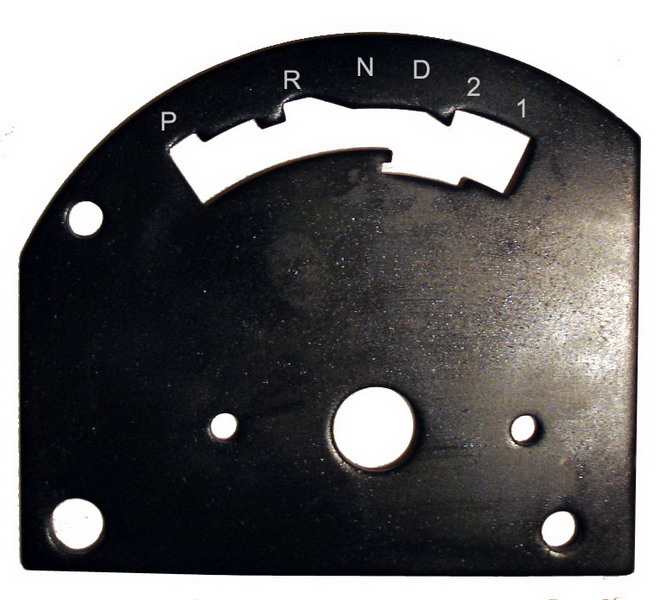 |
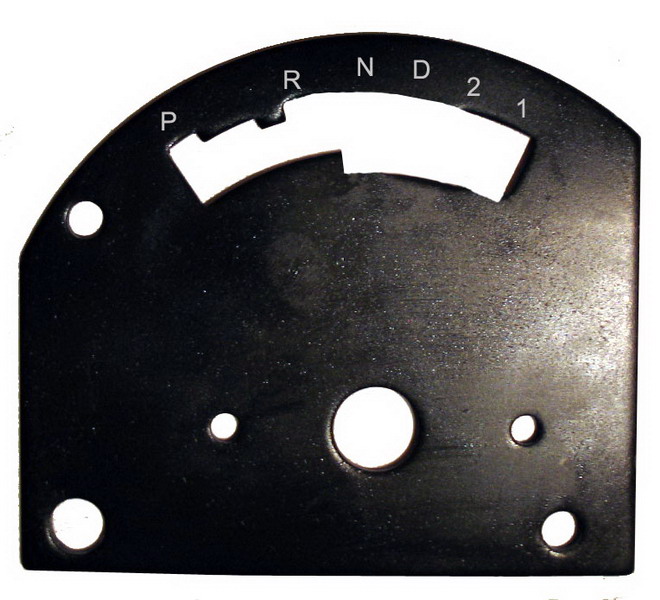
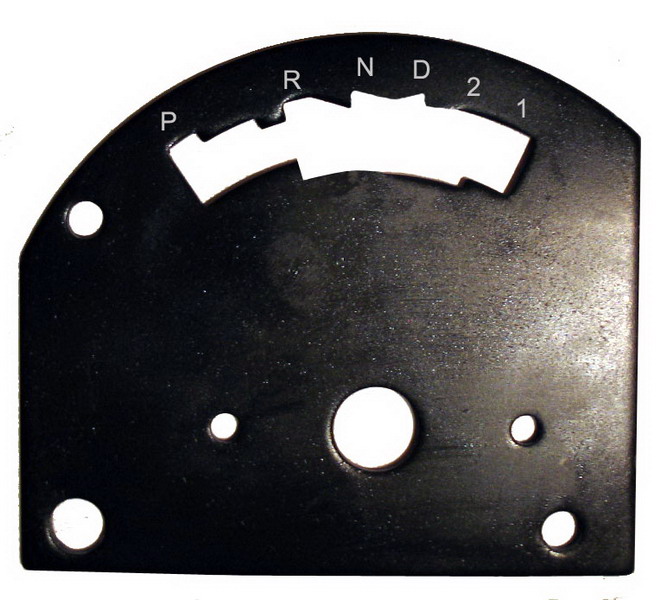
This is a picture of the stock gate plate. There are a couple of different approaches to achieving our goals. I tried two different methods, each designed to allow an instant shift to N or R, but with a distinct difference between them. The difference between the two approaches lies in whether you want to slam neutral without the trigger and reverse with the trigger or vice versa. These two approaches, or designs, I call:
Here's a look at both approaches: |
||||
Design #1 - Reverse-Slam / Trigger-Neutral |
|||||
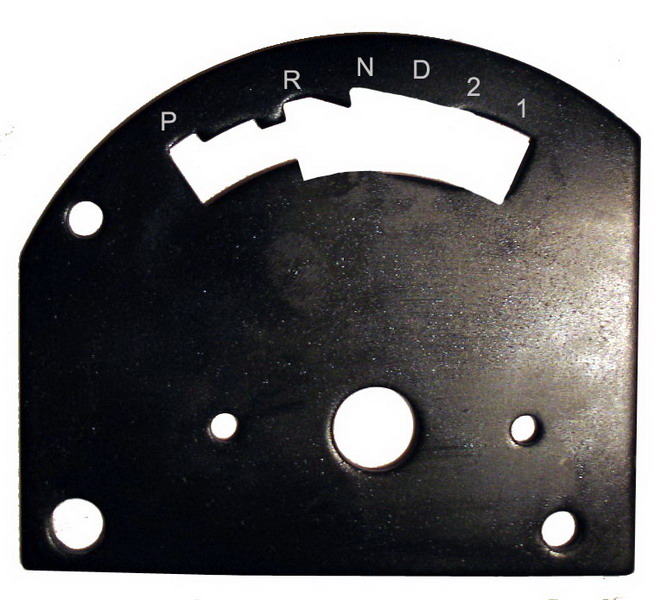
 |
This is the plate modifications I made to be able to hit reverse by just shoving the shifter forward hard, but also be able to hit neutral quickly by pulling the trigger and shoving the shifter forwards. It works because, without the trigger pulled, the trigger spring holds the trigger pin against the top of the gate plate. However, when the trigger is fully pulled the pin is forced against the bottom of the gate plate. Knowing this, you can look at the pic to the left and clearly see how it would allow you to slam into reverse, or pull trigger and slam into neutral. |
||||
| Starting in 1st gear, here's a look at the actual shift positions and the positions of the trigger pin with such a gate installed in the shifter. | |||||
 |
First. | ||||
 |
Second. | ||||
 |
Drive. | ||||
 |
Neutral. To hit this from any forward gear, the trigger is pulled firmly then the shifter pushed forward until the pin hits the gate like this... |
||||
 |
...and the trigger is released. (not the tranny shifts as soon as the lever is in position, The trigger doesn't have to be released for the shift to occur). |
||||
 |
Reverse. Because the top gates have all been removed between 1 and R, the shifter can easily be slammed forward from any gear into this position without the trigger needing to be pulled. |
||||
 |
Park. | ||||
This gate modification was my first attempt. The advantages are:
Disadvantages are:
|
|||||
 |
The first disadvantage is corrected with this re-design. Note the small notch at D. This is enough to catch the trigger pin when coming back into gear, but doesn't interfere with forward slam into R. Now, when coming back into gear from P,R or N you can easily positively hit any of the forward gears as follows:
If you recall my OMI philosophy that "if you have to look, you've buggered it up" then you will understand why I particularly like this 3rd gear notch gate - I can feel and hit every gear consistently, going forwards or backwards, without ever having to look. |
||||
 |
Alternatively, for those with MVB's who plan to be banging the gears up and down constantly, if you wanted you could always just clean out all the gates between the fwd gears, like this, and rely on feel/experience to hit each gear accurately as you shift up and down. This is an example where increased tension on the shift detent spring on the right side of the shifter can be an advantage. |
||||
Design #2 - Neutral-Slam / Trigger-ReverseThe first design was good, especially with the D notch added, but after showing it to my buddy Adrian, he felt it could be improved by reversing the need for the trigger when coming forward to N or R. That is, we decided that if bumping the tranny to N is likely to be more frequently useful than slamming R, it may be preferable to be able to hit N with just a forward push, and require the trigger for slamming R. |
|||||
 |
A redesign was in order, and easy to do since separate gate plates are available for this shifter for only a few bucks. Starting with a fresh plate, this is the result of the redesign. The advantages are:
Disadvantages are:
|
||||
 |
To eliminate the first disadvantage I once again added a small gate at D to catch the trigger pin when coming back into gear, but it doesn't interfere with forward slam into N or R. Once again, when coming back into gear from P,R or N you can easily positively hit any of the forward gears as follows:
|
||||
 |
Alternatively, with this Neutral - slam / Trigger - reverse design,
for those with MVB's who plan to be banging the gears up and down constantly, if you wanted you could always just clean out all the gates between the fwd gears, like this, and rely on feel/experience to hit each gear accurately as you shift up and down.
Again, this is an example where increased tension on the shift detent spring on the right side of the shifter can be an advantage. |
||||
Deciding on the Best DesignWhich design will work best for you will depend quite a lot on your rig and the type of driving you do. If you do a lot of fast, steep climbs, the ability to quickly, flawlessly hit R with the the least though and fewest movements possible should likely be your biggest concern. In this case, Design #1 - Reverse-Slam / Trigger-Neutral is probably your best choice. Design #1 also makes a good choice if your particular transfer case benefits from a tranny shift from fwd gear to R then to N in order to unload the gears/synchros prior to shifting the transfer case. If, on the other hand, you only seldom make such climbs and you find yourself frequently needing to bump easily into neutral then Design #2 - Neutral-Slam / Trigger-Reverse may be the better choice. This could be the case if you have very low overall gearing, a low-stall torque converter, and marginal brakes. With this setup you may have to bump into N every time you come to a stop. Design #2 may also be an advantage if your transfer case shifts well with just a bump into neutral. Ultimately, a choice will have to be made, and that is probably best done after some actual seat time. Again, the beauty of this shifter is that you can easily and cheaply make both a design 1 and a design 2 gate and carry both with you and swap them in about two minutes while trialling. Just remember, it takes only one failed backflip save to make you really, really wish you had gone with design #1! |
|||||
|
Obviously, I have both designs to try, and for the time being have decided to try the Design #2 - Neutral-Slam / Trigger-Reverse with D gate, like this.
|
||||
Following are pics of the shifter in each gear position using this plate; first from the right side showing the gates and trigger pin positions, and then from the left side showing the shift detent lever engaging each of the shift detents. |
|||||
 |
Park. | ||||
 |
Reverse. | ||||
 |
Neutral. | ||||
 |
Drive. | ||||
 |
2nd. | ||||
 |
1st. | ||||
 |
1st. | ||||
 |
2nd. | ||||
 |
Drive. | ||||
 |
Neutral. | ||||
 |
Reverse. | ||||
 |
Park. | ||||
I made the modifications to the shifter by using a silver Sharpie marker to mark the cuts I wanted to make with the gate plate installed on the shifter. I then removed the plate and used a carbide burr in a die grinder, a hacksaw blade, and an assortment of hand files to modify the gates. After reinstalling the gate plate I made any final adjustments to the gate plate with a small round chainsaw file. When you're all done, be sure to thoroughly clean out any fillings lubricate the moving parts of the shifter. It's particularly important for the detent lever / shift detents to be well lubricated as the shifter will freeze up and seem to jam if they aren't. |
|||||
.AVI Windows Media File format - 15 MB
|
Finally - here is a short video clip showing the operation of the shifter with Design #2. Hopefully it shows how I can:
|
||||
|
|||||
|

