 |
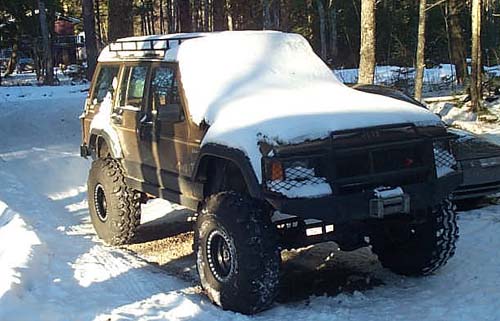
Installing Rockstomper DIY Beadlocks By Bill "BillaVista" Ansell |
IntroductionI researched beadlock wheels to death before I made my decision. In the end, I chose Rockstomper because:1) They are designed for off-road use, not racing use; 2) They are big and beefy with 1/4" steel rings and 32 3/8" bolts; |
 |
3) They are cheap (relatively); 4) The do-it-yourself approach appeals to me as I can do the welding my safe, re-use my existing wheels (with custom backspacing), and save $$ Read on to see all the details, from opening the package to driving the Jeep; the good and the not-so-good. |
|
 |
This is what the poor UPS dude has to drop off. This is actually 2 complete sets (one for me, one for my wheeling buddy Chad: 8 locks = 16 rings) and weighs 130 lbs with all the nutserts, bolts, and washers inside. |
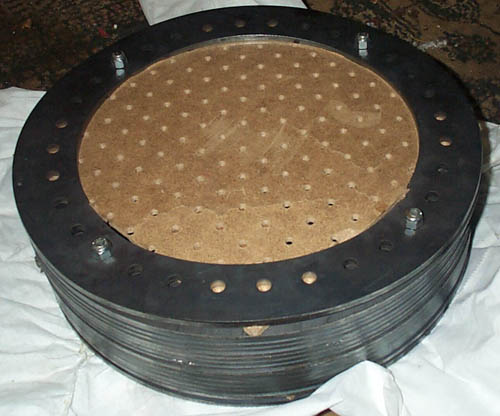 |
The crack in the fiberboard shows it was not treated well by the shipping folks. Probably dropped and it's own great weight caused the damage.....the cracked fibre board is of no consequence but ... |
 |
...
the unfortunate problem was, as it was packaged, the fiberboard didn't
fill the gaps completely between the next-to-outside and outside
rings. As it was obviously dropped, it's own weight caused one
of the outside rings to warp where there was no fiberboard. As Chad
was leaving for Xmas when they were delivered, he kindly offered to take possession
of the warped ring, and work it out with Scott at Rockstomper. I
don't know the final outcome yet, but here's a quote from Chad:
"I sent pictures and explanation to Scott, he has said he will send us a new ring and then go after shipping agent (UPS) for the damages. While I haven't actually got the ring yet, I am confident that this will be done. I am also confident that the damage was the result of shipping damage, I simply can't see how else it could occur." |
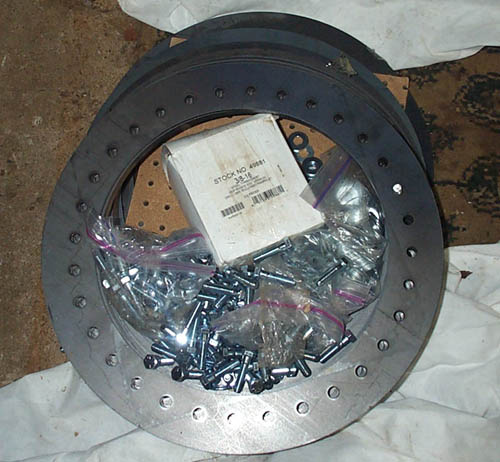 |
Open up
the package and look at all the goodies inside! A total of 256 grade
5 3/8" bolts, 256 Grade 5 washers, and 256 3/8" nutserts.
Personally, I would much prefer to use Grade 8 hardware for its superior
strength, but this would likely increase the price, and so it is not surprising
that Grade 5 is shipped - and it's probably fine.
The rings are all 1/4" mild steel. The inner and outer rings are identical in dimension, except that the inner rings have larger holes for the nutserts to seat in. Both have one edge that is slightly rounded. This is of no consequence on the inner ring, but is nice on the outer ring, as the rounded shoulder seats against the tire. All the rings are completely smooth and burr free, and all the punched holes are of exact dimension without burrs. |
 |
They are
really very easy to install, but it does take some time. First clean
up the outside edge of wheel with a wire brush in an angle grinder or
similar. Next, the inner rings are simply placed on the outside edge
of the wheel. Since they are exactly the same outside diameter as
the rim, it is easy to center them by "fingertip feel and
eye". If the wheels are used, there may be some little gaps
where the wheel is dented a bit, If they're not too large, they can
easily be welded up as the rings are welded on, with the added bonus of
"trueing up" your wheels at the same time. I did this, and
so when the ring was placed on, I tacked it in place as it sat, without
clamping it down to force it to conform to the not quite true wheel rim.
Hey - does my ass look fat in those jeans? |
 |
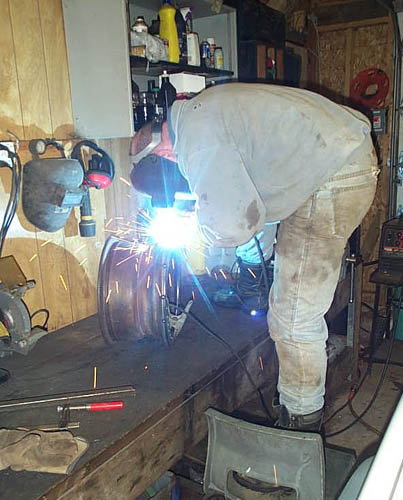
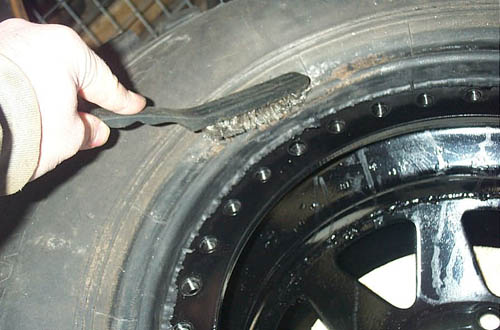
To prevent heat warping the wheel, I welded them on in stages, laying a bead as shown at left, then rotating the wheel 90 degrees and repeating until I was done. I used my trusty Lincoln SP125+ MIG machine with Argoshield (20% Argon, 80% CO2) and .023 L-56 wire. |
 |
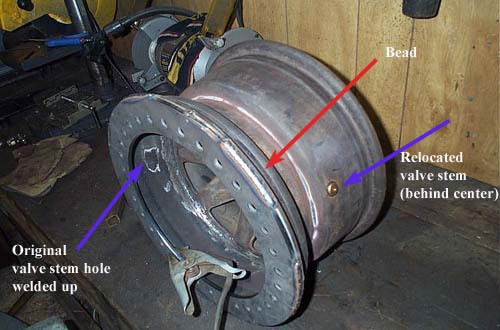
Another shot of the bead. Note you can see the tack welds as well, and the little gap I filled where the rim wasn't completely true. |
 |
One thing
you have to be very careful of when welding in stages like this, is
integrity of the weldment where the beads join. Especially in
this case, since the weld must be 100% airtight - any tiny pinhole will
leak like crazy. In the pic you can see the heat affected zone, and
where it narrows at the ends of the beads. Once all the beads had
been done, I went back, ground down the joins a bit, and re-welded them
all until the heat affected zone appeared equal all the way around.
I tested my first one as follows. Take any liquid with a high "creep", such as diesel or penetrating oil, and pour a little in the crack between the edge of the wheel and the inside of the inner lock ring. Roll the rim around a while. If any liquid creeps through the weld, air will surely leak. |
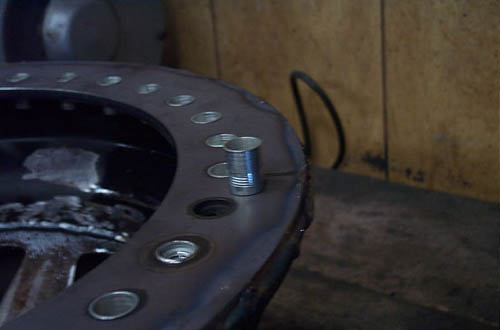 |
Once the ring has been completely welded on, it's time to insert all the nutserts. First you just drop them in the holes, make sure to drop them in the right way round, shown in the picture. |
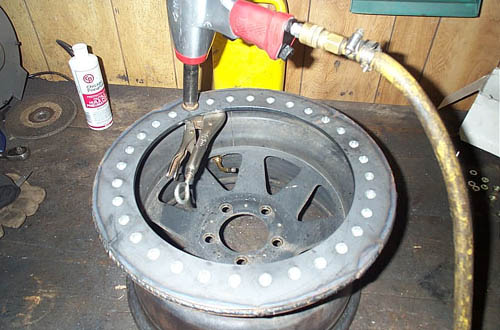 |
Here's
the installation technique. Take one of the bolts supplied, place on
it one of the washers and a spacer of some kind. Thread it into the
nutsert, then grasp the nutsert with vice grips to stop it spinning,
and hit the bolt with the impact. It only takes 30-40 ft lbs to
cinch them up and seat them, so don't go crazy. They aren't the
sturdiest of things, and you can strip them or break the threads loose
from the housing fairly easily. An important tip - don't clamp the
vice grips on the nutsert until after you've threaded in the bolt,
otherwise the jaws of the vice grips can deform the nutsert and it's
threads - they're steel, but fairly light and weak, and if you crank the
vice grips on them, they will squish.
My set of locks only came with a total of 3 spare nutserts, and I ruined 5 during the install (2 were my mistake - I crunched them with the vice grips, 1 had bad threads, and 2 came apart while being installed), leaving me 2 short. I chose not to wait, so just welded a coupe of 3/8" nuts on the back of the ring. A few more extras in the package would be nice. |
 |
Here's the fancy installation tool I used, just a big nut with one of the supplied bolts and washers. Another tip - you need a nice smooth consistent impact gun for this for best results, but they can be seated by hand - it's just a LOT more work. |
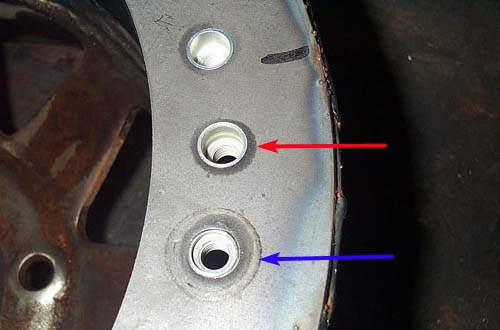 |
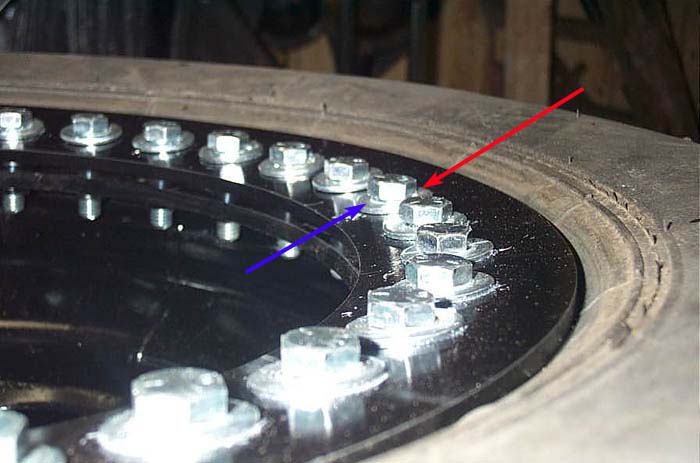
This picture shows an unseated nutsert (red arrow) and one that has been seated (blue arrow). Note that the threads don't pull all the way up flush with the top of the ring. |
 |
Another shot of the installation process, but really just a poseur shot of my purty welding job :-) |
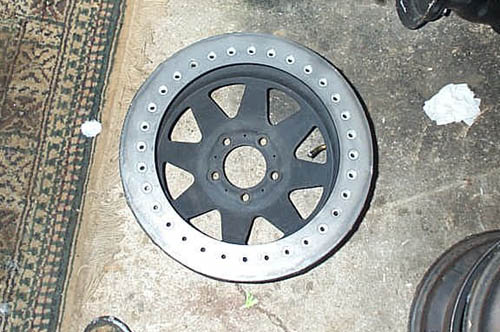 |
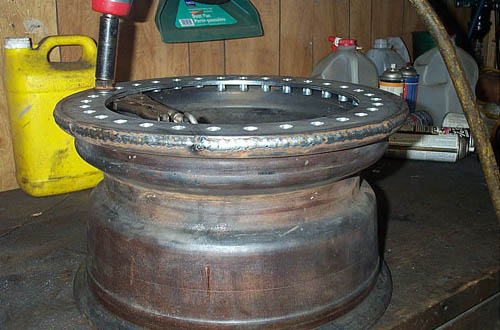
Here's the wheel with the inner ring welded on and all the nutserts installed. |
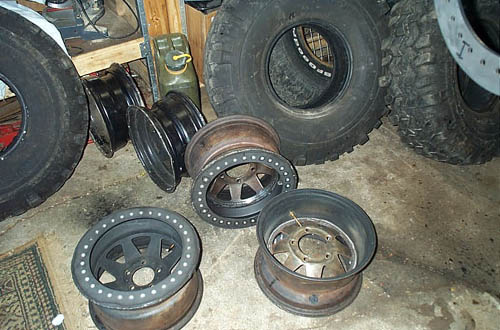 |
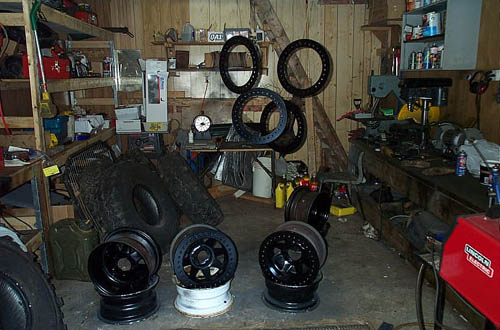
Here they are, all done, and just hanging around with the un-mounted Swampers, waiting for paint! |
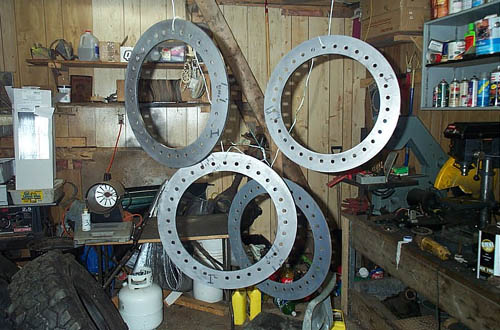 |
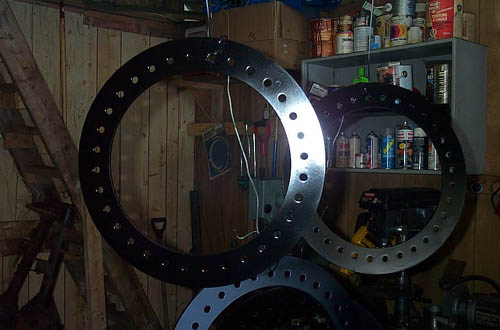
Here are the outer locking rings hung up waiting for paint. |
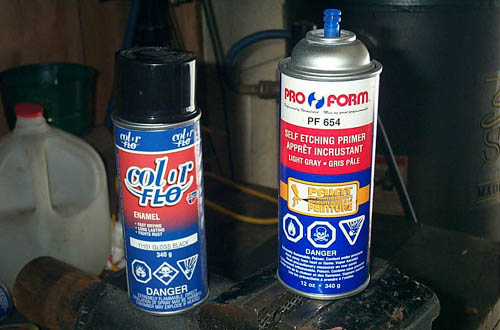 |
Here's the paint I used. A good zinc self etching primer is a must for the bare metal. The Car Quest enamel didn't impress me much, so I shall be returning to using Tremclad next project. |
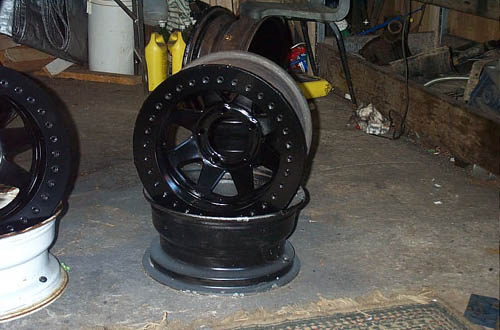 |
Here's one all painted up. |
 |
And the outer rings all painted and ready for installation. |
 |
I painted over the weld as well. |
 |
All done and drying. |
 |
I've
never done any kind of "manual" tire changing before, always
used the big machine at the Military Auto Club before, so I didn't know
how easy or hard it was going to be to get the tire over the outside edge,
especially with the extra profile of the new weld.
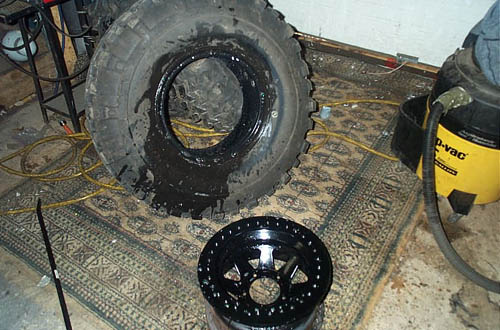
First step was to liberally apply hot soapy water to the tire bead and outside edge of the wheel. |
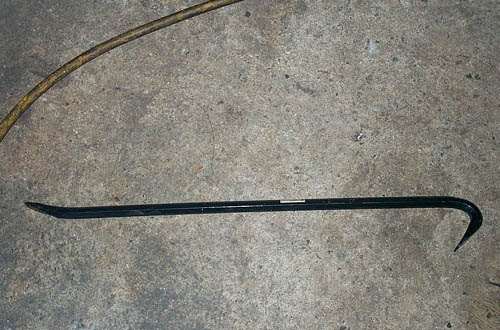 |
I went shopping for some tire spoons, but they were almost $50 each for the big ones at the trucking place, so I bought a couple of plain old 36" wrecking bars for $6 each. |
 |
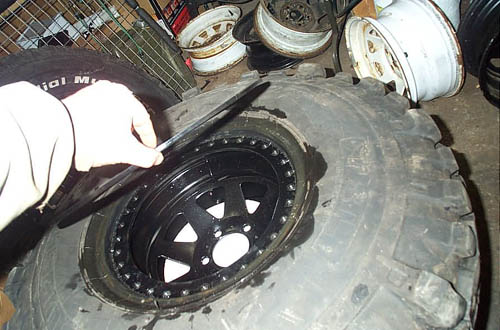
Flop the tire over the wheel, and start the bead over the edge. |
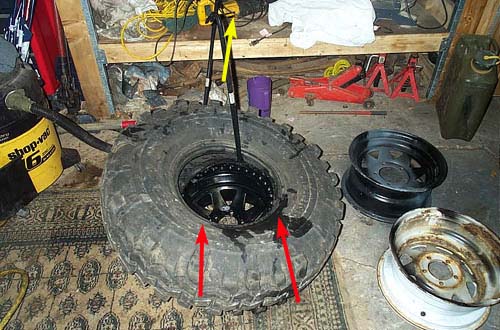 |
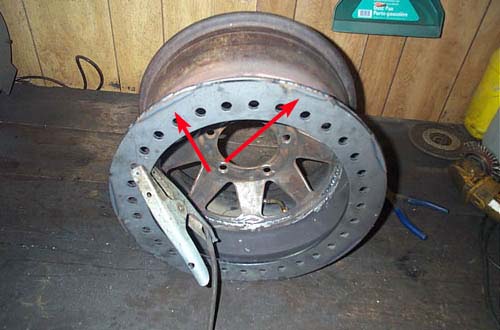
Work it around, then place knees or feet (red arrows) to keep on part that is already on, on while using pry bar to lever the rest of the bead over the edge. |
 |
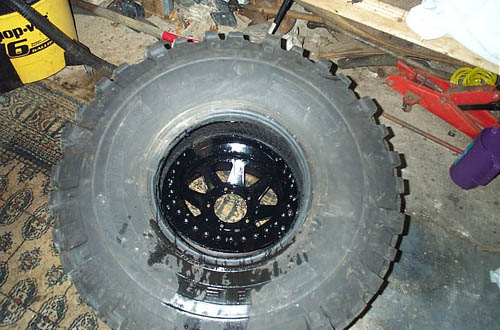
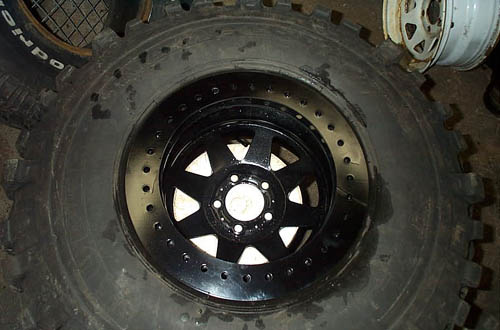
Eventually it will pop over the edge and look like this. |
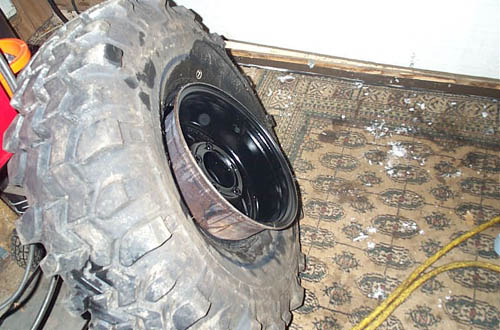 |
This is what it looks like from the back side with the inner bead of the tire over the outer edge of the wheel. The inner bead of the tire will seat on the inner bead surface of the rim when it is aired up later. |
 |
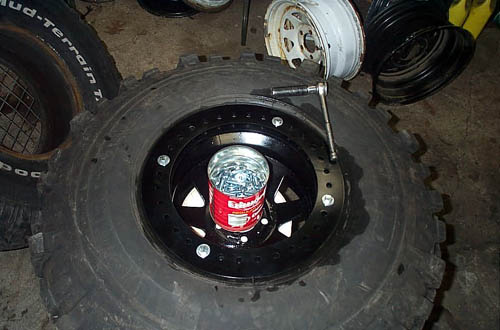
In order
to install the outer locking ring, I picked up the tire and wheel, and
placed it on the top of an overturned 5 gallon pail.
But before I locked down the outer ring, I had to insert my new homebrew "inside the tire balancing" material. |
 |
I chose to use 8-9oz of good old Daisy BBs. Bought a carton of 3000 for $8 at Wal-Mart. |
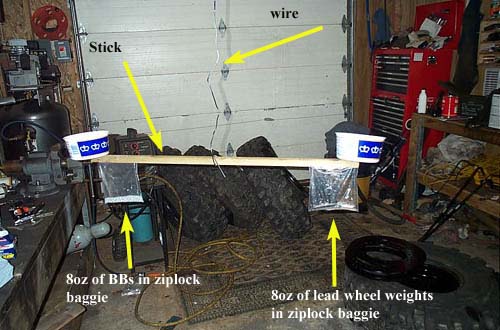 |
I had no idea what they weighed, so here is my ridiculous homebrew scale. I suspended a stick from a wire, and placed 8oz of wheel weights in a bag at one end, then just poured BBs in the other end until it balanced. the margarine pots didn't work because the BBs rolled around too much! It turned out that 8oz was just shy of a quarter of the carton, so I used a shot glass to divide the carton into 4 equal amounts. |
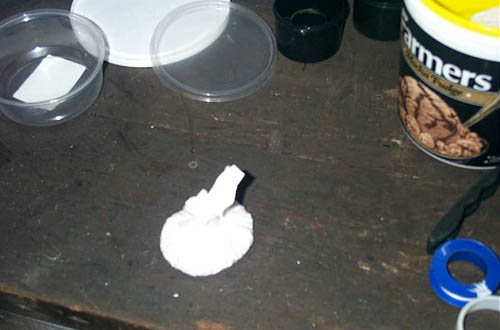 |
But how
to get all those BBs in the tire without spilling them everywhere?
Simple (and silly too). I made 4 little Kleenex baggies by wrapping
them up in a tissue. Now I could easily drop them all in at once,
without spilling, and the tissue will break up inside the tire, allowing
them to spread out.
I'm as nutty as a fruitcake! |
 |
Next, clean the tire bead well....you don't want any leaks. |
 |
And then install the outer locking ring with the rounded shoulder down, against the tire. |
 |
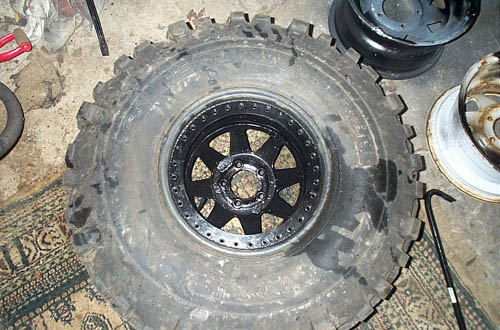
This is how the tire centers. The outside shoulder of the outer ring fits perfectly against the tire bead, centering the tire on the outer ring. And the outer ring is centered on the inner ring, and therefore the entire wheel, by the 32 bolts. It's simple and effective. |
 |
Now it's time to get happy with the bolts and washers. Start by installing 4 in the clock positions, centering up the ring. For the first few, you have to squeeze the rings together a bit to get the bolts started (at least with thick beads on a Swamper you do). |
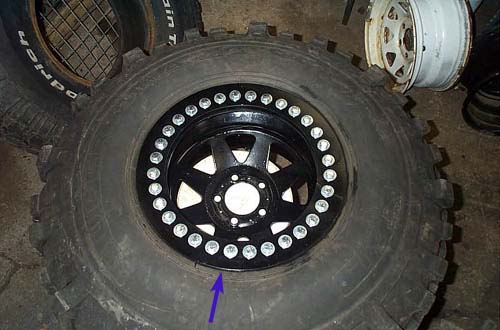 |
All the bolts installed. Arrow indicates where the tire centers on the ring. |
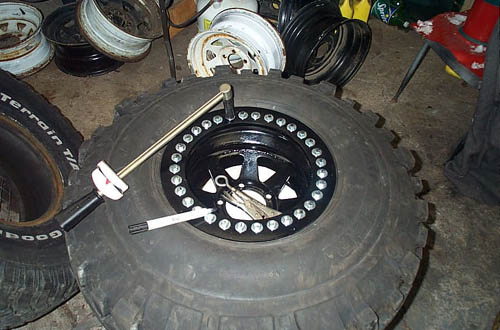 |
Now it's
time to torque the bolts to spec. Rockstomper recommends 10-20 ft /
lbs. I chose 15 ft lbs, and used my beam style torque wrench as it
is more accurate at this low setting than my "click"
style. The first one I did I was very careful, tightening them down
a little at a time, using a big star pattern, and carefully marking each
one with the pen. What a pain in the ass. By the fourth one, I
was zipping them up with a gun, and only applying final torque by
hand. Even then, it takes about 5 complete goes around them all with
the torque wrench to get them all close to the same spec.
The reason for this is the one big weakness in the design (more on this weakness and its affects below too). Normally, in a bolted joint, the materials being bolted are far more "rigid" than the bolt, and therefore, as the bolt is tightened, the joint initially compresses a bit, then the bolt stretches, and as the rigid joint is clamped, torque reading will go up sharply and evenly after the slack is all taken out of the joint. |
| Not so when clamping a steel ring over a piece of rubber, and especially when less than half the ring sandwiches the rubber. The result is an almost endless cycle of tightening one bolt, which compresses the rubber, which loosens the adjacent bolt, which is then tightened.....and on and on...round and round all 32 bolts. Using a star pattern helped very little. The trouble is, the rubber is just too compressible, and the ring doesn't clamp evenly over it. Like I said, I went completely around the circle of 32 tightening each one FIVE times with the torque wrench (and this was only the final step) before they were any where near all at 15ft / lbs. | |
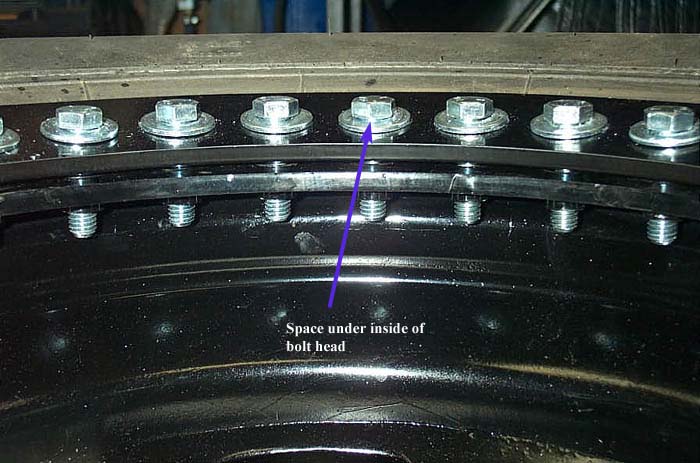 |
The other
effect of the design is the so-called "coning" of the
ring, again caused by the fact that under about 1/3 of the ring is a big
fat rubber bead, while there is nothing under the rest. This means
that the ring doesn't clamp down evenly, the bolt heads do not sit flat on
the outer edge leaving the bolt shanks unevenly stressed, and the ring
takes a shape much like a banked race track.
These next 2 pictures clearly show the unevenly seated bolt heads. On the inside there is a big gap while... |
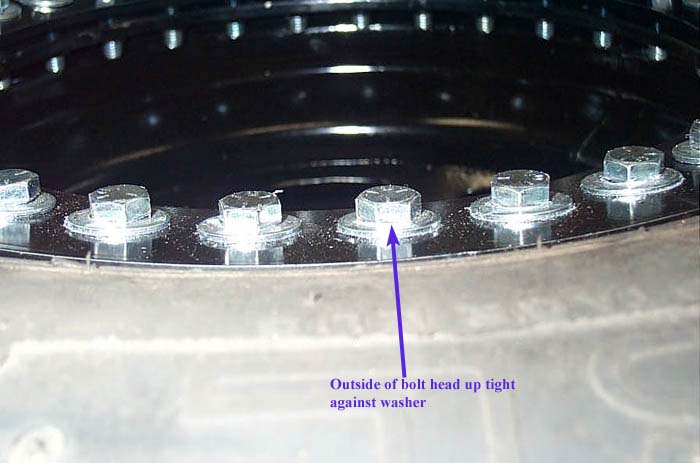 |
...on the outside the bolt head is up tight. |
 |
Red arrow
shows outside of bolt head up tight, blue arrow shows space under inside
of bolt head. Many of the pics on Rockstompers site
show the same affect.
Theoretically, this is not a good way to load a bolt. I'm a bit concerned about the bolts ability to stay tight with only half the head experiencing any friction, and with the rings not clamping evenly. However, sometimes things work out better than it seems, so time will tell if I have problems with broken or perpetually loose bolts. |
 |
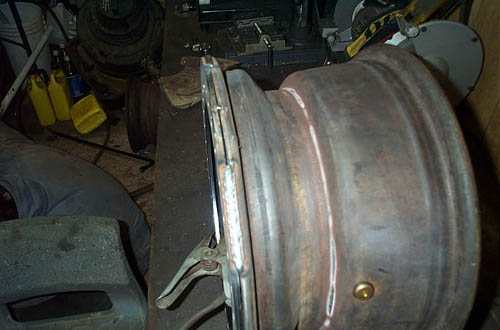
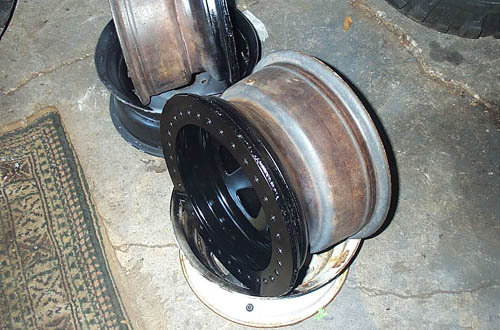
These next 2 pics show the deformation of the outer lock ring caused by this uneven loading. I had to disassemble one of mine immediately after airing it up because one of my welds had a pinhole leak. The bolts had been tightened to 15 ft / lbs and were in place for about 5 minutes. On the right is a never installed outer ring, that lies flat, on the left the just removed ring that shows the deformation or so-called "coning", evidenced by the gap (red arrow). |
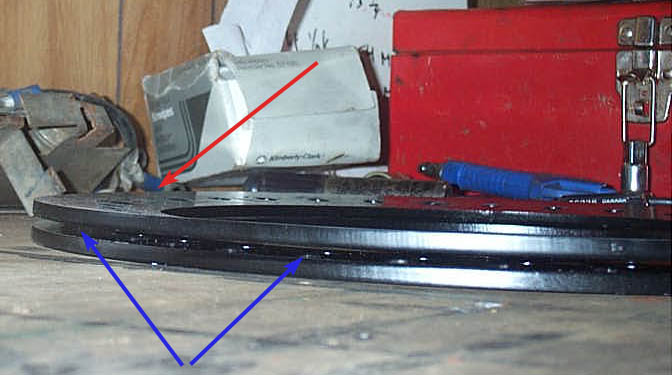 |
Here the
deformation is clear as the installed ring sits on top of the flat never
used ring.
This doesn't really worry me, the ring went back on very easily (it wasn't at all difficult to line the bolts back up as I had thought it might be), but it is something to be aware of. In the end, all 4 tires are completely leak free as of initial installation (no miles). |
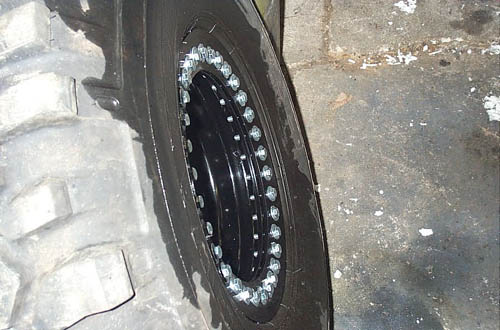 |
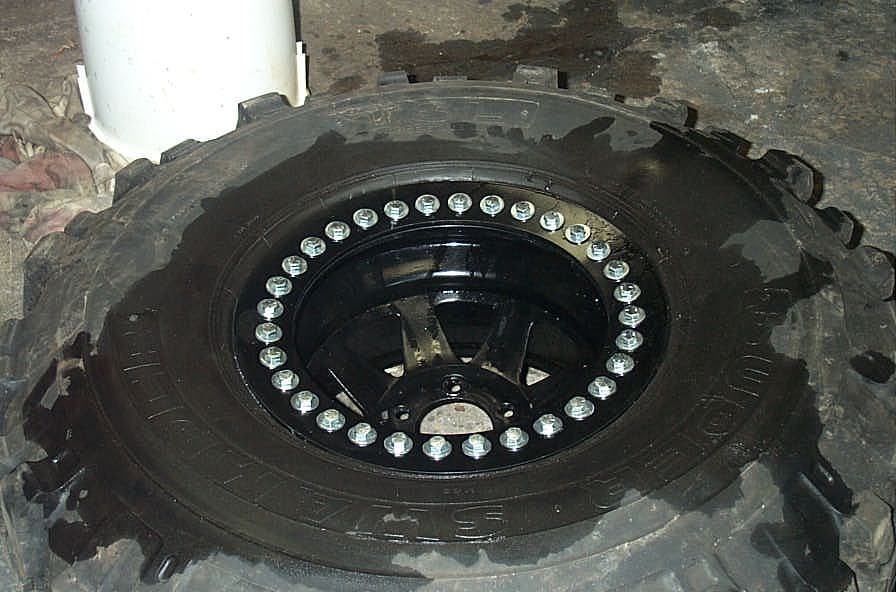
Here it is, all installed and leak tested. |
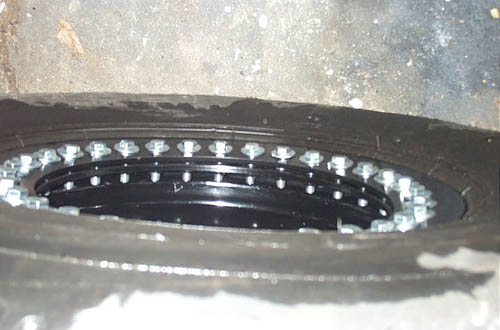 |
Oooooh - look at all those bolts :-) |
 |
Mmmmmmmmmmmm - beadlocks !! |
|
This one is super - size...you really can't have too many pics of new beadlocks ! |
 |
Kicker is.....when my wife got home, she came in and said "Honey, the new wheels look great"! |
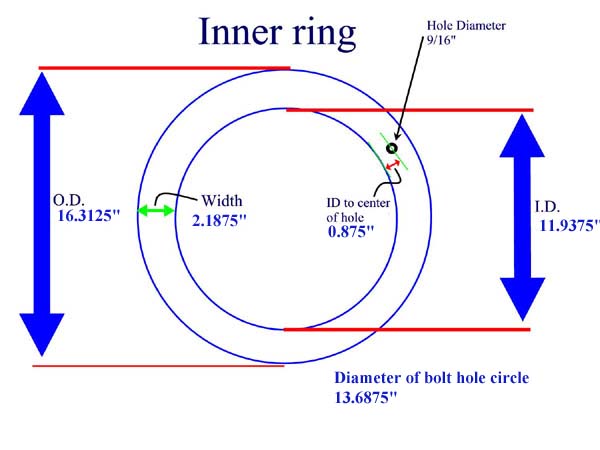
Summary: Well, time will tell I guess. Everything is great except that I'm really not happy with those bolt heads like that....but it may not become an issue, we shall have to see. I will update this article with results and data as I get them. They look great, were cheap and pretty easy to put together, best of all they are thick and tough looking, and should hold up really well under trail abuse. Update #1We were having a discussion online about how to alleviate the problems of the "coning" which results in the uneven bolt heads. A lot of suggestions centered around placing something under the inside edge of the clamping ring, so that the outer locking ring could clamp down more evenly. One clever guy suggested: How about a plain old V-belt? Costs a couple of bucks, and for larger rigs they come in (can you guess?) ...... LARGER SIZES! I used to have several in the 5/8 -3/4 - 7/8" wide range hanging in a shed, these were for alternator and air compressor drive on 855 ci Cummins in an old Freightliner, if memory serves. Hard rubber, cord reinforced, and infinitely adjustable for length with a pocket knife. To which I replied: The rubber spacer (o ring, cut bead, v belt, whatever) will help the coning problem, which is good, but it will do bugger all to help the "almost impossible and takes forever to get them torqued" problem What if you placed the bolt holes and bolts closer to the center of the wheel, so that there was enough room around them (shanks of the bolts) for some custom spacers (like thick washers). You could source and offer different widths for different tires, and even develop an equation so people could measure their tire beads and know what they needed. A few people e-mailed me asking for more info about the "issues" as I saw them...below is a compilation of my responses. To me, the "coning" and bolt angles are actually separate but related issues. I would define the "coning" as the way in which the ring takes a "set" and after first use takes on the "banked race track" appearance. The cause, being a bead under one side, is the same as the cause for the bolt heads not sitting flat, but I see the 2 as separate results of the same design. I really don’t care about the coning, as in the shape of the ring, it's just the angle of the bolts that has me "concerned". I would agree that I am not exactly displeased.....but not highly impressed either....call me cautiously optimistic at this point. Update #2A few folks have e-mailed me about how happy I am with them. Below is my answer: I guess the bottom line you want to know is “Bill, are you happy with them, should I buy them” Not surprisingly, the answer, IMHO is, “That depends” If money is no object (like that’s realistic!) – I would say not, and I would opt for Champion beadlocks on forged Alcoa / MT wheels. But that’s not the case for most of us. So, here’s the “depends” part. I would say yes if a) you want to keep your current wheels for any reason (e.g. custom BS) b) You want relatively cheap, tough materials, and enjoy the DIY aspect c) You like the idea of widening your current wheels, or creating an uncommon width (e.g. starting with 7” rims and making 9’s) d) You don’t do a lot of street driving (My concerns over the bolts are not completely sullied, and I sure wouldn’t want one to pop off on the street and fire across the road and into the leg of some kid standing at a bus stop or whatever) They are, IMHO, certainly the best of the “DIY” kits based purely on the superior thickness used and number of bolts – that is, they are better than any “race’ DIY kit you’ll get from Summit racing or the like. Likewise, I believe them to be a better choice than using pre-fab racing beadlock wheels (Bart, Basett, etc) since the racing wheels use a thin lightweight rim . shell and a fairly thin, flimsy ring.. They are at least the equal of many pre-fab beadlock wheels such as the MRT, etc. Since I have no experience with the Trailready and Aggro designs, I can’t compare to those. The Champions are clearly superior, however, but not in the same $$ range. As far as which bolt design to get – since all will be subject to the same design…uhh, what’s a nice way of saying “flaw”…anyway – I can’t see spending the extra $$ for either different bolt style “upgrades” – the button head or countersunk. Just not worth it IMHO, since you’re living with an imperfect design in the first place. What you’ve got is a Heavy duty, homebrew, rough and ready product with the Rockstomper beadlocks – not a polished finished design – and I wouldn’t bother spending any extra $$ than necessary. I’d have been a bit ticked off if I’d sprung for countersunk bolts and the heads hadn’t sat straight in the countersinks. Chad summed it up best when he said “FWIW I think we still made out good - not because the product was outstanding, but because of Still not happy with my waffling…OK, OK, OK…if backed into a corner and forced to decide, black and white, happy or unhappy….definitely “happy”…….just not “thrilled”!! Some guys have also been asking about the dimensions, so they could fab their own, so I dug out the measurements I took, and came up with these: |
|
 |
|
 |
|
| UPDATE # 1 - balancing with BBs - this was after only the first trip or 2 on-road
here's the first impression of the BB's. UPDATE # 2 - balancing with BBs - After a few hundred on-road kilometres. I have neither added any anti-freeze nor verified whether any water is inside the tires, but I can tell you this. Up to 100 km/h, the BB's are working FANTASTICALLY - the tires are smooth and stable, and don't even really require any "warm-up time" Over 100 km/h, the Jeep starts to shake and bounce around pretty badly, and over 120 it is pretty violent. Is this just he tires? Is it worse at the speeds because of the BB's? I dunno - but I do know that I'm happy as hell poking along at 100 km/h, saving a little gas and riding smoothly! CONCLUSION - Well, after quite a few more road miles, and a few off-road trips....I upgrade my final appraisal to "very satisfied". Sure the design isn't perfect, and theoretically there are problems, but so far, in my own practical experience - I have had no problems on or off road, not even one loose bolt so far. Chad's Experiences. Remember I ordered 2 sets at once - one for me, and one for my good buddy Chad? Well, he finally got around to making his, and supplied the following comments: I am entirely unimpressed with the nutserts. Virtually every single one of them felt like it was stripping when I started to tighten the bolts. Given that they look like aluminums to me, I wasn't convinced they would not strip. In the end I got two wheels done, but each has one botched nutsert in it - one stripped, the other just plain old fell out. Of course, once you get the locks cinched down even a little, it's impossible to get the old one out and you can't fit the new one between the two rings. And I wasn't about to go undoing everything all over again. In the end I decided that I would accept one nut per wheel, which I will thread onto the bolt on the inside of the inner ring. I'll try to get nylocks. Then I will change out the frigged up nutsert the next time I have the ring off - which will hopefully be NEVER! It was a royal pain getting the bolts done up - remember Rico has my compressor right now. So it was all by hand. Hands up, all those with a torque wrench that accurately reads down to 10 foot lbs. No one? Not surprised. My bar style torque wrench appears to START at 10 foot pounds. In the end I relied on my 'inner torque wrench', kinda like the 'force'. Actually, I used to take the head apart on my Kawi race bike and found that a two finger pull on my craftsman 3/8 ratchet was exactly 15 foot lbs, what was required on the camshaft caps and cam cover. Accurate enough that I didn't need to use a torque wrench, so I used the same technique on the bolts. I can see what you mean about the impossibility of getting these things tight at 10 foot pounds, not going to happen. Mine coned too, although not nearly as bad as yours, I believe, due to the fan belt I put in there. Perfect length, not quite wide enough. I'm going back to see if I can get one slightly wider (like 3~4mm), but I kinda think I got the widest type already. Anyway, it'll keep the gunk out of the bolts, if nothing else. In the end, I'm convinced that neither the coning nor the actual torque amount nor the equality of the torque across the ring matter that much. The way I see it, as long as every bolt on the ring has enough torque on it to keep load on and stay tight, it's not going to loosen, and you're not going to be in danger of catastrophic failure unless a significant number of adjacent bolts fall right out. If we check them regularly, I think they'll be fine. I'm also going to buy 4 bolts the same as the ones supplied but 2 inches longer. Both the holes that eventually lost their nutserts were the initial holes I used to start the ring, which is actually really difficult to get the bolt straight because of the thickness of the Swamper bead. I think if I had some really long bolts to get it started, that might save that initial nutsert because currently the bolt won't go in there straight due to the fact that I have to clamp the outer ring down in a couple of spots in order to get it anywhere near close enough to start the current bolts, and this inevitably leads to some misalignment between the rings, which causes the bolt to go in crooked. I think longer 'starter' bolts might be the trick here. Longer starter bolts and a thicker fan belt might make the whole thing a lot better. I'm unsure if all the beadlocks are built this way. Do they all use nutserts? if they do, on the one hand I'm unimpressed, on the other at least there is a remedy if one of them is screwed - you CAN replace it. I read about one company which manufactures the ring in such a way that you can replace a nutsert without disassembling the wheel - THAT'S the ticket, as far as I am concerned, if I win the million that's what I'm getting. I'm unsure at this time if maybe there are higher quality nutserts out there (?) that would have made me feel better about the whole nutsert thing or not. In the end, I think simply doing them up with an air ratchet is fine. I did 3 times star pattern, 3 times round pattern, by the end of that cycle they may not have all been equally torqued (I'm not sure you ever could get them all exactly even), but they were all tight. Set you ratchet not to tighten too much and zip away, I say, I don't think the end result is that finicky. Chad's Experiences II. Earlier this year, Bill and I bought bead locks from Rockstomper. Bill wrote an article about his experience, and mine was more or less the same, with the following additions/exceptions: The Delivery Issue As some of you may know, when our package of bead locks was delivered it had been dropped and one ring was damaged. I volunteered to take this one and sort it out with Scott and Rockstomper. The good news was that he immediately agreed that the bent ring was not my problem, and agreed to send me another one, after which he would try to get compensation back from UPS for the damaged package. The 'bad' news was that in the end it took until February before I got that final ring. You could look at it as I ordered at the end of November and finally got my product mid February, but there were other circumstances surrounding the issue. Basically when Scott said he would send a new ring to me, in the back of my mind I was thinking 'I'll never see that', not because I thought he wouldn't send it, but because things have a mysterious way of disappearing on their way to me. When this ring did not show up after 6 weeks, I called and he sent another one, this one registered so that we could somehow trace it. This one took forever, to the point where we actually put a trace on it because we thought is wasn't coming and it came the next day. If it didn't come at that point I would have courier it myself. The problem with registered mail is that although you can trace it, it takes a week. So lesson learned. Do I think they failed me by not sending it overnight? No. I think their obligation ended when they agreed to send the new ring at their own expense. Had I to do it over again, I would offer to pay to have it courier – that is the only real way to have a traceable package sent. I do think the missed an opportunity to serve me better, but they are under no obligation to do so. The Coning Issue Anyone who reads Bill's story will see there is a lot in there about the coning of the outer ring. In order to prevent this, I put in a fan belt inside of the bolts to help prevent it. I used a 17405 fan belt, which I believe means it was 17 (mm?) wide, and 40.5 inches long. It fits perfect, and although it does not resolve the coning issue completely, I believe it does relieve it greatly, as well as providing a barrier against debris getting into the bolts. I think it would solve the issue completely if the belt were wider, but I got the widest one I could and it was not wide enough for SX Swampers. For something with a normal sized bead, like a BFG or MTR, I think it would probably work fine. I have to agree with Bill that the idea of evenly torqueing these bolts down to 10 foot pounds is a joke. I got mine even at what I believe was abut 15 foot pounds, but that took about 6 ~ 8 go rounds with a small ratchet. Hands up anyone who even has a torque wrench that goes that low. It's basically impossible. My view, having done it, is that the coning is not really an issue, nor is the 'evenness' of the torque. As long as you get good load on all those 32 bolts, you will be fine. The fan belt helps from an aesthetic point of view, but in either case, I don't think that the side load on the bolts is one which ultimately effects their ability to hold the bead on or stay tight. The Nutserts The nutserts are a pain, but they may be the least objectionable solution available. My basic problem with them is that they are aluminium, and just don't 'feel' right when you are tightening them. I buggered 2 of them when I was installing them, and did in two more when trying to get the ring started. Once they are in they work OK, but they always feel a little like they are stripping when you are tightening them. As it turned out, most of them were not, but it's just not a comfortable feeling right off. What I found is that before installing the outer rings, you should get yourself several 3 inch bolts to go into the nut serts. These you can use to start the ring. I found that I screwed up 2 nutserts by trying to get the bolts that came with the rings started when they simply aren't long enough to start a thick bead like a Swamper. Do yourself a favour, get the longer bolts, start the ring with the longer bolts, then switch to the regular ones when you get all 32 bolts started. I did this on my last 2 and they worked out fine, no nutserts destroyed. When you are get those longer bolts, also get yourself several nylock locking nuts to fit them. This is what I did, so if I destroyed a nutsert, I could just use one of the longer bolts, put a nutsert on it, and I would then repair the nutsert next time I broke down the wheel. This will ease your mind, to have everything you need sitting there, and be prepared for a nutsert breakage ahead of time, because basically you just have to accept that a certain small percentage of these is going to break, and when they do, you cannot fix it without breaking the entire wheel apart. So be prepared and you will have fewer headaches. The BBs I also put BBs in my tires, and I can report the same effects as Bill. I put in 12 oz in each tire, just because my tires are notoriously hard to balance, and in my mind if the principal behind all this is correct, then a little more weight than necessary should simply distribute itself evenly around the tire. My rig has never driven this well with Swampers on it – not even when I first got it out of the balancing shop after getting my Swampers mounted the first time. There is less vibration, less hopping, and significantly reduced flat spot effect. The BBS also redistribute themselves after I've been wheeling, whereas any fixed weight is going to potentially get moved, and/or will not adjust to changes in the wheel after wheeling. BBs (or something similar) work, plain and simple. Scott from Rockstomper.com answers questions about his BeadlocksThe only thing I'm unsure of and want to figure out before I buy the Rockstomper locks is this. The outer ring on the Rockstompers is flat - meaning as you tigten the bolts, it will begin to "tilt" as it squeezes the tires bead. In contrast, MRT use a "lazy Z" shape outer ring (in profile) so that the bolted surface will tighten flush to the inner ring while the Z accomodates the tires bead. Any comments appreciated - is it a concern...why? We recommend torqueing the bolts no higher than 20 ft-lb. The ring will start to "cone" at about 35. As for "why don't you make the ring have metal-to-metal contact" stuff... we wanted a beadlock that'd actually fit all the different tires we might run... from a 31" General Grabber (hey, everybody needs gas mileage sometimes) to a 44" Bogger. Putting a metal support or similar in there, limits what bead thicknesses you can run. Put in a thick one, to match, say, a Bogger, and you've gotta over-torque the thing to make it seat and seal on the Grabber (reverse coning it). Put in a thin one (to match the Grabber) and you cone it to fit a Bogger. Bottom line is, don't torque 'em past 20 ft-lb, and we haven't seen any coning at all. It's when they're torqued to full stall on the air ratchet (no, I'm not kidding, and yes, I do know that's nowhere near what an impact wrench will do), at around 40-50 ft-lb (twice-plus what's recommended for any beadlock), they'll cone a bit. Still haven't broken 'em... I guess that's 'cause I've got too many bolts When is the price going up? I'll confirm that the price will remain the same through at least the end of '01. After that, I dunno... the threaded inserts are the biggest problem. Right now, we're having trouble getting them in the quantities we need at less than a dollar apiece (no, I'm not kidding) so if those problems continue, the price will have to reflect it eventually. I've personally spent three days so far searching all over (physically, web, and on the phone) trying to find a less expensive insert that's still just as durable, and just as maintainable (easy to put in or take out in case you mess it up) as these, and that we can get reliably. The rings come in from the CNC house. If they get button head or hex head bolts, the outers stay as is. The inners (of course) get welded to wheels and/or shipped out as-is; if we weld 'em, we pop in the inserts too, if they ship out as a kit, the inserts ship uninstalled (to keep weld splatter out of the threads). We ship extra inserts just in case, since the install is cake, but it's possible to screw up a couple. We give you 35 per wheel, you need 32. The first one of these I ever did, I hosed all of one insert; I didn't mess up any on the next seven wheels that I did. The countersunk outer rings, get countersunk in house. A cheapo countersink bit, costs about $10-15, and will do a full set. It'll be pretty well toast after that, but it'll do 'em. If you decide further on down the road that you want countersunk bolts, you can countersink the rings yourself, and get the bolts either from us or from any industrial fastener house. So the direct answer on countersinking, is yes, you can countersink 'em later; we do it all the time here. The rings all start out life the same. Why are the bolts so long they stick into the wheel like that?
Hey Scott is it possible for you to make me a send out kit for 20" Rims Yes, we can make up a set to fit 20" rims. They'll be quite a bit more expensive, but we can do it. Probably on the order of twice as much. But just think, you'll be the only guy on your block with 20" beadlock wheels. Turnaround would probably be on the order of a few weeks to a month, too... just FYI. With the Rockstomper design, where they say that they don't cut the outer bead lip off....this may make it cheaper...but would it not also mean you lose the (significant) advantage of being able to easily mount and dismount tires in the field with no special tools, like you can with regular beadlocks?? I find that many peopel don't understand this concept, so you are not alone. Cutting the stock bead surface off or not is irrelevant when it comes time to mount tires on a beadlocked wheel. On a beadlocked wheel, the inner bead is still used, but the outer bead of the tire now sits OUTSIDE of the rim, and in the case of a beadlock, OUTSIDE of the new welded on flat plate. That being the case, whatever is behind that welded on plate is irrelevant, since the tire doens;t tough it any more. You can't "just drop the tire over the outer bead seat" on any wheel, beadlock or not. It takes some work; if it doesn't, there wouldn't be enough material there to hold the bead properly. I can do it by hand with a hammer and a tire spoon (or a chunk of tube in a pinch), but it doesn't "just drop on". The other brands of lock setups I've played with... are exactly the same when it comes to tire install. What centers the tire on the wheel with the Rockstomper design? The outer ring centers the tire on our beadlock design. It sounds like it'd be imprecise, but with 32 bolts, it's consistently within 1/32" of round and centered. I wish I could get Swampers that were that close. Basically, just start about four bolts with the outer ring sitting on the bead, and then keep adding bolts till they're all started. Torque 'em all down (that takes a while) and then seat the inner bead, and you're ready to play. But for centering, the outer ring centers the tire, and the bolts center the outer ring to within 1/32". What's involved with welding on the inner ring? Is it something a lathe or machine shop is required for, or is it something a competent welder could do at home? If you're putting the locks on the outside of existing wheels, you don't need a machine shop. You do need a competent welder, and straight wheels. Since the lock welds to the outer lip, if your wheels are hashed, this is a good time to get new ones. If you're wanting to keep your existing wheels, and not widen them in the process, you'll need a big lathe or a mill to machine off the outer bead. We'll do it, but it's a PITA; Then the rest of the install is pretty much the same Assuming you put 'em on the outside, all you have to do is wire-wheel the paint, grime, rust, etc., off your wheels (obviously, with the tires off) around the outer lip where you'll be welding. Then put the inner ring on (the one with bigger holes in it) and center it up by hand. It's an exact match for the OD of the wheel, so it's cake to center, just run your fingers around the OD of the whole thing. Tack it in place in a couple opposite spots, then keep crisscross-tacking it till you've got it tacked in about every three inches or so. Then go back and fill in the space between the tacks. Since you're depending on that weld to hold the air into the wheel and also to hold the lock ring onto the wheel, it has to be a good weld; if you're not a good welder, don't try it. That's why we offer installation. But a competent welder, can install them him/her self. After the rings are welded on, you'll need to pop the rivet-nuts (a bolt, a stack of washers, a pair of Channel Locks and an impact wrench make this really quick-n-easy), then put the tire back on, put all the bolts in, snug it all up, air it up, and go play .Ok, i know they are for "offroad use only," but say someone was planned on using them onroad. With the self weld concept, would there be anyway to get them somewhat balanced so driving down the road was not annoying. Balancing them is not a problem if you have a friend at a tire shop. Many tire shops won't touch 'em for fear of liability or something, but they balance just like normal wheels. You just have to use stick-on weights instead of clip-ons. Or use Equal, or steel shot, or golf balls, or any of the assorted other methods for balancing wheels that come up around here. Most of 'em work, and most are a lot cheaper than a trip to the tire shop every time you go 'wheeling (to fix the out-of-balance from the chunked tread) When milling the outside edge off so you dont add alot of extra width to your existing wheel when adding the beadlock, how much do you take off. I have access to all the machinery, just need an idea of how much to mill off. If you choose to mill it off, you should mill it off to the safety bead, which is typically about 1.25-1.5" down from the outer lip of the wheel. You'll see it there, with the tire off, about an inch in from the inside of the outer bead seat area. I love those button head bolts. Will I be able to get a allen wrench in them after 5-6 runs? My rims have taken a bad beating from the rocks. I've usually been able to use a little pick to get crud out of the allen heads. Worst-case, with the button heads, you can grind off the heads if they're really really really hashed, but I have yet to booger one up that bad. I've even got the same bolts holding on my skidplate, and they're still serviceable. Does this mean I will need to pay for a machinist to install these on my rims?
I can run a bead as nice as the one I saw in the pics, so I don't think I need a welder. I'm more concerned about my rock rashed edges. One lip even has a slight bend in it. So, just smooth the lip of the rim out and weld away? If the bead edges aren't really hashed, you can smooth 'em up (grind off the high spots till they're true again) and weld away. If they are really hashed, it's time for a rim (or four), depending on how hashed they are. Slight low spots are much easier to deal with, than high spots--lows just mean a little gap to fill with the welder, while highs mean an out-of-true wheel. Are there sides to either the inner or outer lock ring? One side is rounded; the other isn't. The rounded edge goes towards the tire. It's not that important, but it makes life a little easier; the rounding is very slight. The bigger holes are the inner ring right? Correct. Weld on inner ring before inserting nutcerts? Correct. What is the torque spec? 20 ft-lb maximum; I've got mine at 10, and not leaking. |
|
|
Sources: Rockstomper Inc.P.O. Box 724 Firestone |
|

