 |
Gettin’ the Gears Done By Bill "BillaVista" Ansell |
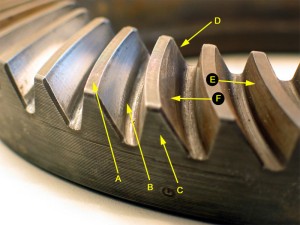 |
Figure 1 – Ring-gear nomenclature Key: A – Top. The top of the
gear tooth, a.k.a. Face, Top Land * Don’t be mislead by the terms “coast” and “drive”, as the ring-gear can be driven by the pinion on either side of the teeth. Which side of the teeth will depend on if the gear-set is standard or reverse spiral and whether the vehicle is going forward or in reverse. |
|||||||||||||||||||||||||||||||||||||||||||||||||||||||||||||||||||||||||||||||||||||||||||||||||||||||||||||||
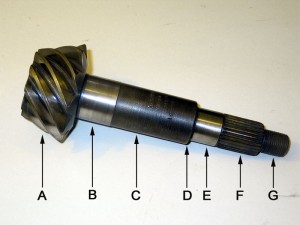 |
Figure 2 – Pinion nomenclature Key: A – Head |
|||||||||||||||||||||||||||||||||||||||||||||||||||||||||||||||||||||||||||||||||||||||||||||||||||||||||||||||
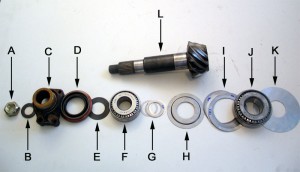 |
Figure 3 – Pinion assembly nomenclature Key: A – Pinion Nut |
|||||||||||||||||||||||||||||||||||||||||||||||||||||||||||||||||||||||||||||||||||||||||||||||||||||||||||||||
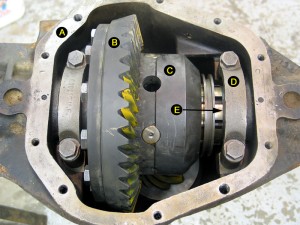 |
Figure 4 – Carrier nomenclature Key: A – Housing (a.k.a. Pig,
Pumpkin, Chunk, Centre Section)* * Note that technically, Dana/Spicer refer to part C as the “Case – Differential” or just “Case” and part A as the “Carrier.” However, most of us have been calling C the “Carrier” (and hence D the carrier-bearings and so forth) for so long that I shall stick to that to avoid confusion. |
|||||||||||||||||||||||||||||||||||||||||||||||||||||||||||||||||||||||||||||||||||||||||||||||||||||||||||||||
When describing the various bearings used in the diff, I shall use the term “bearing” to mean the two-piece assembly, “cup” to mean the race by itself and “cone” to indicate just the roller-bearing portion. TheoryOK, so we know setting up the gears requires care and precision, but the entire process is really just a matter of adjusting four separate but inter-related settings until they all fall within specification. The four settings are: |
||||||||||||||||||||||||||||||||||||||||||||||||||||||||||||||||||||||||||||||||||||||||||||||||||||||||||||||||
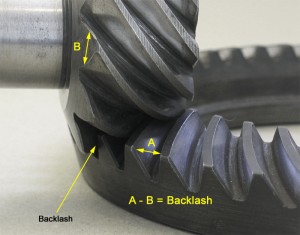 Figure 5 – Backlash |
Backlash Definition: The amount by which a tooth space exceeds the thickness of an engaging tooth. Think of it as: Play between the mating teeth of gears or how tightly the ring and pinion gears mesh together. How Measured: Measured as the free movement of the ring-gear with pinion held steady, in thousandths of an inch, using a dial indicator on the ring-gear. In other words, you’re measuring how much you can rotate the ring-gear before it engages the pinion teeth – this is the space between the teeth – called “backlash.” Adjusted Via: Carrier shims. Adding shims on the ring-gear side of the carrier moves the ring-gear closer to the pinion, causing the teeth to mesh more closely, decreasing the amount the ring-gear can rock without turning the pinion, and therefore decreasing the backlash. Adding shims on the non ring-gear side moves the ring-gear away from the pinion, increasing backlash. Note that: carrier shims added to one side must be subtracted from the other, and vice versa, to maintain a consistent carrier pre-load. Note: Backlash changes about 0.007” for every 0.010” the carrier is moved. The purpose of having backlash (i.e. the reason gears aren’t set-up tight, with no play) is to prevent the gears from jamming together. Lack of backlash may cause noise, overloading, overheating, or seizing and failure of the gears or bearings. |
|||||||||||||||||||||||||||||||||||||||||||||||||||||||||||||||||||||||||||||||||||||||||||||||||||||||||||||||
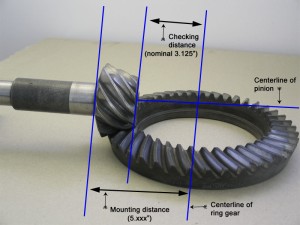 Figure 6 – Pinion Depth |
Pinion
Depth Definition: Position of pinion-gear relative to the ring-gear centreline, expressed as either a mounting distance (measured from behind the pinion head to the centreline of the ring-gear) or a checking distance (measured from the face of the pinion head to the centreline of the ring-gear). Think of it as: How close the head of the pinion is to the centreline of the ring-gear. Proper pinion depth makes sure the pinion teeth mesh with the middle of the teeth on the ring-gear – between the top and the root. Increasing pinion depth moves the pinion closer to the centreline of the ring-gear, moving the pinion “deeper” into ring-gear teeth and reducing the checking distance. How Measured: The final determination of correct pinion depth can only be obtained by reading and interpreting the gear tooth contact pattern using gear-marking compound. There exist specialized tools for measuring pinion depth, but they are expensive, aren’t necessary, and are only used to calculate a starting point – final proof always lies in the contact pattern. Adjusted Via: Inner pinion shims placed between the housing and the inner pinion-bearing cup. Adding shims moves pinion closer to ring-gear centreline, moving the pattern from the top to the root. Removing shims moves pinion further away from ring-gear centreline, moving the pattern from the root to the top. Note: When adjusting pinion depth, begin with a starting shim stack and make large adjustments at first (10-20 thou) until the correct setting is bracketed; then make progressively smaller adjustments until the final setting is achieved. Adding or subtracting a single shim of one thou can, and does, make a difference. Increasing pinion depth also decreases backlash and moves drive pattern slightly towards toe, and coast pattern slightly towards the heel. Decreasing pinion depth also increases backlash and moves the drive pattern slightly towards the heel, and the coast pattern slightly towards the toe. Increasing pinion depth will also increase pinion-bearing preload unless the outer pinion shims are adjusted. |
|||||||||||||||||||||||||||||||||||||||||||||||||||||||||||||||||||||||||||||||||||||||||||||||||||||||||||||||
Pinion-bearing Preload Carrier-bearing Preload |
||||||||||||||||||||||||||||||||||||||||||||||||||||||||||||||||||||||||||||||||||||||||||||||||||||||||||||||||
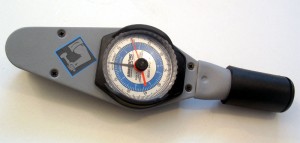 |
Figure 7 – Dial indicating inch-pound torque wrench | |||||||||||||||||||||||||||||||||||||||||||||||||||||||||||||||||||||||||||||||||||||||||||||||||||||||||||||||
ToolsYou will require a good, complete set of regular hand tools including the usual hammers, punches, wrenches, sockets, and the like. Air tools are not a must, but will certainly make the job a lot faster and easier. You will also need the following:
Step by step procedureBefore beginning this, or for that matter any other job on your rig, be sure you have and actually use proper safety equipment –especially eye protection. It’s not just some lame legal requirement that makes me say that – it’s the fact that I have a synthetic lens in my left eye and a rather painful memory of a piece of steel wire sticking half an inch into my eyeball. So just wear the gear, OK? There are four main phases to the job of setting up the gears. They are:
DisassemblyDisassembly is straightforward. If you’re not completely confident at this point, it might be an idea to consult a manual or have a buddy help – even if only for moral support. Personally, my buddy likes to stand around and make what I’m sure he imagines are clever remarks while drinking my beer. I won’t mention any names to protect the guilty – but he does the most amazing 3-D technical drawings! I, of course, respond by making him count ring and pinion teeth and clean old bolts with a toothbrush! Having said that, the following points are worth mentioning:- You can set-up gears with the axle in the vehicle, but it is a pain. I highly recommend you remove the axle first. If you leave it in the vehicle, removing and reinstalling the gears while you adjust the shims becomes such a PITA that you’re liable to lose patience and compromise your set-up. - Be sure to mark the carrier-bearing caps with a punch so that they can be reinstalled in the exact location and orientation as they were originally. - As you disassemble the carrier and pinion, makes sure you label all shims, bearings, baffles, and washers with their original location, orientation, and dimensions. - When you drive the pinion out of the housing, do not smash the threads with a great big hammer – use a brass punch. However, do not get so distracted with thinking how clever you are to have thought of this for once, that you happily drive the pinion from the housing only to watch it fall four feet and smash onto the concrete floor! PreparationFirst, assemble all the required tools and parts, clear a place to work, and then clean and inspect all the components, including the new ones. You need to remove any protective coatings or packing debris and it’s not unheard of for new bearings or shims to have flaws, and now is the time to find out if they do. You should also take the time to measure all the new shims with the micrometer and label each one with a fine-tip permanent marker. This will make the job of making adjustments much easier. I recommend starting with a good quality master install kit and always use new bearings – it’s cheap insurance and gives peace-of-mind. You must also never re-use a pinion nut or ring-gear bolts. I have a preference for Dana / Spicer gears and set-up kits and Timken bearings but there are other good quality components. I would, however, recommend avoiding the Motive Gear install kits as they give you an inadequate number of shims, and those included, according to my measurements, come in odd and confusing dimensions like 12.4, 14.8, and 16.5 thou; compared to the Dana shims I used which were all standard dimensions like 3, 10, and 20 thou, and varied by no more than 0.0001”. |
||||||||||||||||||||||||||||||||||||||||||||||||||||||||||||||||||||||||||||||||||||||||||||||||||||||||||||||||
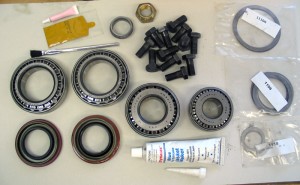 Figure 8 – Master install kit contents |
A complete master-install kit containing everything you need should include:
|
|||||||||||||||||||||||||||||||||||||||||||||||||||||||||||||||||||||||||||||||||||||||||||||||||||||||||||||||
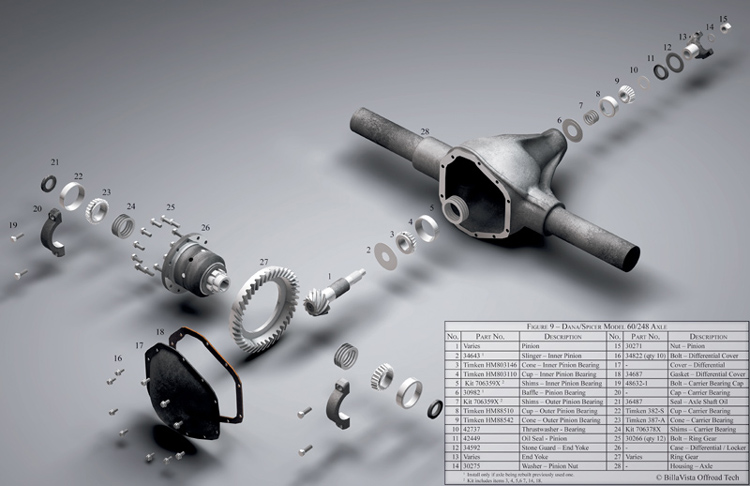
Many also include some cheap thread-locker and silicone RTV gasket-maker, which I usually throw away in favour of my own favourite brands. The condition of the old parts will determine whether you need to buy any required slingers, baffles, or thrust washers. Depending on whether you are starting with a complete axle assembly or a bare housing and collection of used parts, this can be a little confusing. To aid in identifying and ordering components, below is a 3D exploded diagram of the venerable Dana 60, complete with Spicer and Timken part numbers: This is no ordinary "picture" or "diagram". It's a 'built from scratch', fully rendered, 3D engineering diagram created especially for this article by BillaVista Offroad Tech's own graphic artist, Lonny Handwork. The version seen above doesn't even begin to do it justice. Below you can either (left-click->open) or (right-click->save as) a number of different versions that more accurately showcase the incredible detail, lighting, and shadowing. Figure 9 - Dana/Spicer Model 60/248 axle in:
No matter what axle you are working on, you should always order an extra pinion nut for use during set-up. The reason is, you absolutely must use a brand-new nut during the final assembly otherwise it will almost certainly loosen as it is a soft, deformed-thread style locknut designed to be used only once. You don’t want to use the old nut for set-up as it’s probably in poor shape and you risk ruining the pinion threads, so you need one new nut for set-up and one new nut for final assembly. Whatever components you choose, make sure you get them from a knowledgeable and reliable source – it’s very frustrating to get the wrong parts and if you screw up or need help, a trusted vendor is worth his weight in gold. I’m a big fan of Ted at Peak Empire Extreme Offroad Inc. and can highly recommend him – in fact, there’s a funny anecdote later (well, funny now – looking back) about how Ted saved my butt after a ridiculous blunder I made that almost kept this article from being written! The last tasks before proceeding are:
|
||||||||||||||||||||||||||||||||||||||||||||||||||||||||||||||||||||||||||||||||||||||||||||||||||||||||||||||||
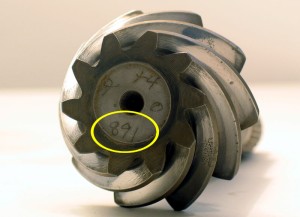 Figure 11 – Gear-set number on pinion-gear |
The nominal checking distance for a Dana 60 pinion is 3.125”. However, each matching gear-set will have its own ideal checking distance. Often (but not always) a pinion will be marked with a figure that shows, in thousandths of an inch, the difference between the nominal distance and that gear-set’s ideal distance. The pinion in Figure 11 is engraved with “+4” which indicates that its ideal checking distance is four thousands of an inch greater than nominal, or 3.125” + 0.004” = 3.129”. The exact figure is not really important to us, but if both pinions have such a marking the markings should be recorded now as they can be used to help calculate the starting inner pinion shim stack. Copy down the number and its sign from both old and new pinions. If you’re starting without an old gear-set or if one of the pinions doesn’t have a checking distance marking – don’t bother, as you will have to use a different method to calculate a starting shim stack. | |||||||||||||||||||||||||||||||||||||||||||||||||||||||||||||||||||||||||||||||||||||||||||||||||||||||||||||||
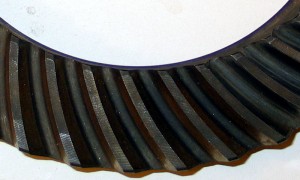 Figure 10 – Counter-clockwise spiral ring-gear teeth |
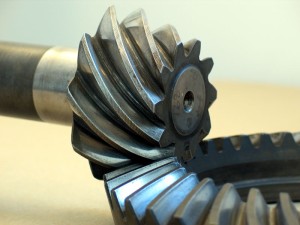
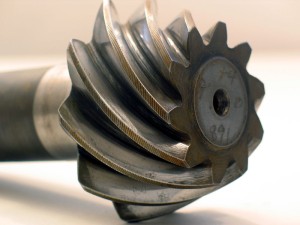
You can distinguish standard cut gears from reverse spiral by looking at the face of the ring-gear and the face of the pinion. Standard-cut gears will have ring-gear teeth that spiral out from the centre in a clockwise or right-hand direction and pinion-gear teeth that spiral counter-clockwise. Reverse-spiral gears will have ring-gear teeth that spiral counter-clockwise and pinion teeth that spiral clockwise. Figure 10 illustrates counter-clockwise reverse spiral ring-gear teeth. Figure 11 illustrates clockwise, reverse spiral pinion teeth. | |||||||||||||||||||||||||||||||||||||||||||||||||||||||||||||||||||||||||||||||||||||||||||||||||||||||||||||||
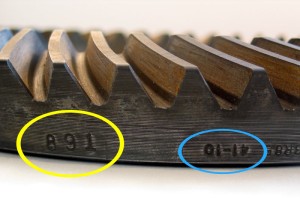 Figure 12 – Ring-gear set number and tooth count |
Ring and pinion-gears must always be used in matched sets, or the teeth will never mesh correctly. Each gear-set is stamped with an identifying “set number” on both the pinion and ring-gear. Figure 11 shows the set-number on the pinion, circled in yellow. Figure 12 shows the same number stamped on the ring-gear. | |||||||||||||||||||||||||||||||||||||||||||||||||||||||||||||||||||||||||||||||||||||||||||||||||||||||||||||||
To check a gear-set’s ratio, count the number of teeth on the ring-gear, and divide by the number of teeth on the pinion. For example, a 4.10 gear-set will have 41 ring-gear teeth and 10 pinion teeth. The number of teeth will also be stamped on both the ring-gear (Figure 12, blue circle) and on the shaft of the pinion. If all the numbers match up the next step is to make your set-up bearings. Since you will have to install and remove the bearings repeatedly in order to change shims while adjusting the gears, you need to make a set of cones and cups that will slip easily in and out of the housing and on and off the carrier and pinion so you can avoid pulling and pressing the new bearings each time. Not only does this make the job faster and much easier, but it also avoids damage to the new bearings that would otherwise almost certainly occur with repeated removal and installation. Using a small rotary tool such as a hone, grinding stone, or sanding drum:
The old carrier-bearing cups can be used as-is for set-up, and the new inner pinion-bearing cone and outer pinion-bearing cup are installed immediately and left in place throughout the set-up and final assembly. The last step before you actually begin is to calculate the starting shim stacks. There are several different methods, the choice of which will depend on the circumstances as outlined below. The more accurate this calculation, the faster the actual set-up adjustments will go, but in the end, any of the methods will work as you just need to calculate a place to start. Whichever method is used, you should always set up gears using new shims rather than re-using the old. Starting Shim Stack CalculationsIf you are just changing the gears or if you are replacing the carrier and re-using the old gears, the quickest method is to simply start with new shims equal to the old shim stacks. You should measure each shim individually when calculating the old and assembling the new shim stacks, as measuring a stack of shims together can lead to inaccuracies. Note that any slingers or baffles (i.e. part numbers 2 and 6 in Figure 9) form part of the inner pinion shim stack. This means that if you are re-using gears that had a slinger or baffle (or both), but you aren't re-using the slinger and/or baffle, you must add the thickness of the deleted slinger/baffle to the starting inner pinion shim stack. The same is true in reverse. If you are using a slinger and/or baffle with a set of gears that didn't use them originally, you must delete the thickness of the newly added slinger/baffle from the starting inner pinion shim stack. If both the old and new pinions have checking distance markings (aka depth codes), the starting point for the new inner pinion shim stack can be further refined as follows:
If you are starting with a bare housing or have no old shim stack to copy, you will have to begin with a nominal shim stack for inner and outer pinion shims. Try 35 thou for the inner pinion shims to start. Calculating a starting point for the outer pinion shim stack is a little more critical because if you start with far too thin of a stack you will crush the pinion bearings when you torque the pinion nut (you can tell if you have done this because the bearings will forever feel notchy). To calculate a starting outer pinion shim stack: install the pinion with a large stack (50-60 thou), measure the pinion end-play with your dial indicator, subtract 10 thou from this measurement and use the result as your starting outer pinion shim stack. If you have no old shims it is possible to calculate a starting point for the carrier shims as follows: 1. Install ring-gear on carrier. 2. Install set-up bearings, without any shims, on carrier. 3. Install carrier in housing, without pinion installed, and install bearing caps just tight enough to keep bearings in place, but not so tight as to stop them from sliding side to side. |
||||||||||||||||||||||||||||||||||||||||||||||||||||||||||||||||||||||||||||||||||||||||||||||||||||||||||||||||
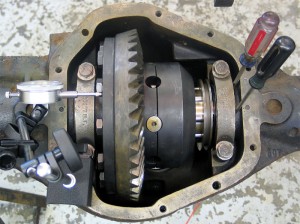 Figure 13 – Calculating starting carrier shim stacks |
4. Set dial indicator to back of ring-gear. | |||||||||||||||||||||||||||||||||||||||||||||||||||||||||||||||||||||||||||||||||||||||||||||||||||||||||||||||
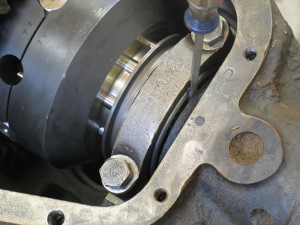 Figure 14 – Prying carrier towards ring-gear side |
5. Insert two screwdrivers beside the non ring-gear side bearing cap, between the housing and the carrier-bearing cup. 6. Pry carrier towards ring-gear side as far as it will go, rock ring-gear slightly to seat bearings, and set dial indicator to 0. 7. Remove screwdrivers and insert them between housing and carrier-bearing cup on the opposite side. |
|||||||||||||||||||||||||||||||||||||||||||||||||||||||||||||||||||||||||||||||||||||||||||||||||||||||||||||||
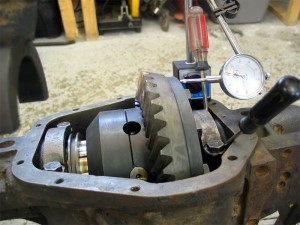 Figure 15 – Prying carrier towards non ring-gear side |
8. Pry carrier towards the non ring-gear side and record the reading on the dial indicator. | |||||||||||||||||||||||||||||||||||||||||||||||||||||||||||||||||||||||||||||||||||||||||||||||||||||||||||||||
9. Repeat steps 4-8 until result is consistent and record result as “total carrier shims” (does not include carrier preload shims). 10. Remove carrier and install pinion using starting shims. 11. Reinstall carrier (without shims) in housing and install bearing caps just tight enough to keep bearings in place, but not so tight as to stop them from sliding side to side. 12. Set dial indicator to back of ring-gear. 13. Insert 2 screwdrivers between housing and carrier-bearing cup on ring-gear side of carrier. 14. Pry ring-gear into mesh with pinion-gear as far as it will go, rock ring-gear to seat bearings and allow gears to mesh. 15. With pressure still on the screwdrivers set dial-indicator to 0. 16. Reposition screwdrivers to opposite side of carrier and pry carrier as far as it will go and record the reading on the dial indicator. 17. Repeat steps 13-16 until result is consistent and record result as “shim stack for ring-gear side”. 18. Remove carrier and pinion. 19. Calculate “shim stack for non ring-gear side” by subtracting “shim stack for ring-gear side” obtained in step 17 from “total carrier shims” obtained in step 9. With all tools and parts assembled and starting shim stacks calculated you can finally begin the actual installation and gear set-up. As you will be repeatedly juggling and adjusting the four settings, it’s important to take careful notes to keep track of the settings you have tried and the results obtained. To help me keep track I printed several copies of the following table:
Installation and Setting Pinion-bearing Preload |
||||||||||||||||||||||||||||||||||||||||||||||||||||||||||||||||||||||||||||||||||||||||||||||||||||||||||||||||
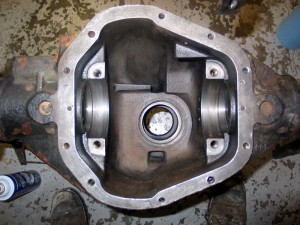 Figure 16 – Clean housing |
1. Clean axle housing thoroughly with solvent and dry with compressed air. Be sure to remove all trace metal particles from the housing. | |||||||||||||||||||||||||||||||||||||||||||||||||||||||||||||||||||||||||||||||||||||||||||||||||||||||||||||||
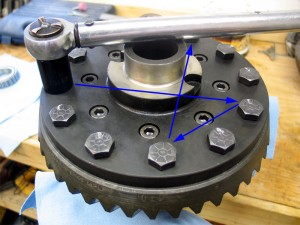
Figure 17 – Installing ring-gear on carrier |
2. Install ring-gear on carrier. It will be a tight fit and if you cannot get it seated by tapping it lightly into place you can try placing the carrier in the freezer and the ring gear in a warm stove for a couple of hours in order to get the ring-gear to fit (warning: not all family members are likely to find the aroma of cooking 90wt attractive!). Get the ring gear started square to the carrier, and before you tap it all the way into place, insert four evenly spaced ring-gear bolts to makes sure the ring-gear will seat with the bolt holes properly aligned. Once you get the ring-gear driven into place it will be almost impossible to rotate it to line up the ring-gear bolt holes. DO NOT use the ring-gear bolts to “pull” the ring-gear into place. Once in place, install new ring-gear bolts using thread locker (NEVER re-use ring-gear bolts!) and torque them to spec in three stages in an even criss-cross pattern. Unlike this picture, one should not use an impact socket with a torque wrench. The reason is simple enough - impact sockets are softer than normal, hardened sockets (so that they don't shatter under impact). However, this also means they are more prone to deflection under load and therefore can potentially lead to less accurate torque settings. It's a minor point, but important to note when striving for accuracy. |
|||||||||||||||||||||||||||||||||||||||||||||||||||||||||||||||||||||||||||||||||||||||||||||||||||||||||||||||
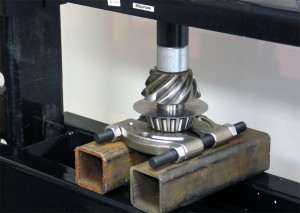 Figure 18 – Installing oil slinger and bearing cone |
3. Install inner pinion oil slinger and new inner pinion-bearing cone on pinion, preferably using a press to avoid damaging the bearing and to ensure the cone seats square on the pinion. | |||||||||||||||||||||||||||||||||||||||||||||||||||||||||||||||||||||||||||||||||||||||||||||||||||||||||||||||
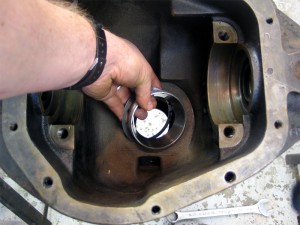 Figure 19 – Installing inner pinion-bearing shims and cup |
4. Install baffle (if used), inner pinion shim stack and pinion-bearing setup cup in bore. | |||||||||||||||||||||||||||||||||||||||||||||||||||||||||||||||||||||||||||||||||||||||||||||||||||||||||||||||
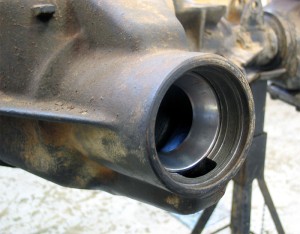 Figure 20 – Installed outer pinion-bearing cup |
5. Install new outer pinion-bearing cup in bore. | |||||||||||||||||||||||||||||||||||||||||||||||||||||||||||||||||||||||||||||||||||||||||||||||||||||||||||||||
 Figure 21 – Installing pinion preload shims on pinion |
6. Install pinion preload shims on pinion. | |||||||||||||||||||||||||||||||||||||||||||||||||||||||||||||||||||||||||||||||||||||||||||||||||||||||||||||||
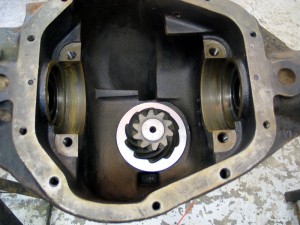 Figure 22 – Installed pinion |
7. Install pinion in housing, being careful not to drop the preload shims - alternatively you can install the pinion first and then slide the preload shims on the shaft, making sure they seat against the shoulder. | |||||||||||||||||||||||||||||||||||||||||||||||||||||||||||||||||||||||||||||||||||||||||||||||||||||||||||||||
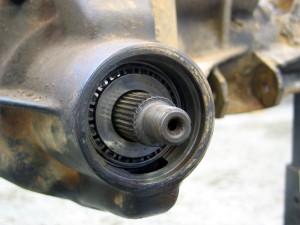 Figure 23 – Installed outer pinion set-up bearing |
8. Slip outer pinion set-up bearing cone onto pinion shaft, ensuring it seats fully in the cup. | |||||||||||||||||||||||||||||||||||||||||||||||||||||||||||||||||||||||||||||||||||||||||||||||||||||||||||||||
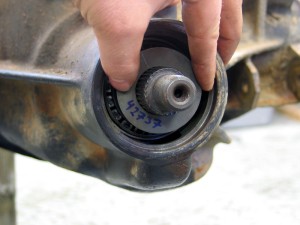 Figure 24 – Installing thrust washer on pinion |
9. Install thrust washer on pinion | |||||||||||||||||||||||||||||||||||||||||||||||||||||||||||||||||||||||||||||||||||||||||||||||||||||||||||||||
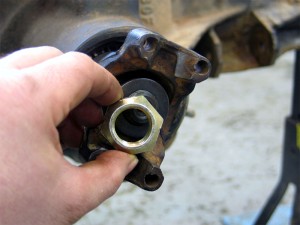 Figure 25 – Installing yoke, washer, and pinion nut |
10. Install yoke, washer, and pinion nut. Do not install the pinion oil seal at this time as it is not required for set-up and will only be damaged by repeated installation and removal. 11. Using a tool to hold the yoke, torque pinion nut to 255 ft-lbs. Do not simply hammer the nut on with an impact wrench, as the torque on the nut has a direct effect on pinion-bearing preload. |
|||||||||||||||||||||||||||||||||||||||||||||||||||||||||||||||||||||||||||||||||||||||||||||||||||||||||||||||
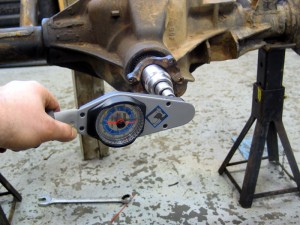 Figure 26 – Measuring pinion-bearing preload |
12. Measure pinion-bearing preload by using an inch-pound torque wrench. You must measure the torque it takes to rotate the pinion by the nut while it is in motion. If you simply measure the torque it takes to start the pinion rotating you will get an artificially high reading. This is why a dial-indicating torque wrench is best as you can start the pinion rotating, then read the indication from the dial while you continue to rotate the pinion. Preload should be 20-40 in-lbs for new bearings, and 10-20 in-lbs for used (i.e. set-up) bearings. 13. If pinion-bearing preload is not to spec, remove pinion and repeat steps 6-12 as required, adjusting the pinion-bearing preload shims as follows: add shims to reduce preload, subtract shims to increase preload. |
|||||||||||||||||||||||||||||||||||||||||||||||||||||||||||||||||||||||||||||||||||||||||||||||||||||||||||||||
Setting Backlash
|
||||||||||||||||||||||||||||||||||||||||||||||||||||||||||||||||||||||||||||||||||||||||||||||||||||||||||||||||
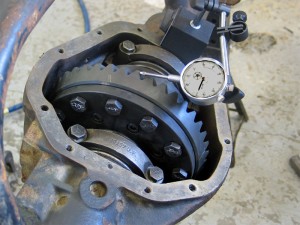 Figure 27 – Measuring backlash with dial indicator |
a) Install dial indicator so that it is as perpendicular as possible to the ring-gear tooth. You want to place the button against the top-heel of the tooth, and arrange it so that the shaft is as close as possible to 90 degrees to the tooth at that point. | |||||||||||||||||||||||||||||||||||||||||||||||||||||||||||||||||||||||||||||||||||||||||||||||||||||||||||||||
4. If backlash is not within spec adjust as follows:
Setting Pinion Depth
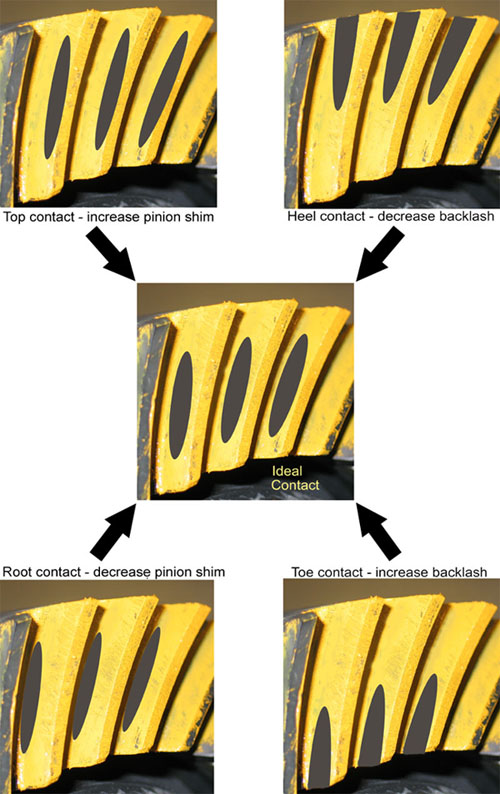
Once backlash is within spec you can set the pinion depth by reading the gear tooth contact pattern as follows: 1. Clean ring-gear teeth. 2. Using a small, stiff brush apply gear-marking compound to three or four teeth of the ring-gear, in at least two different places. Use the marking compound sparingly, but be sure to completely cover both the coast- and drive-side of the teeth. Some folks like to mix a little gear oil with the marking compound to aid in application but I found using it straight worked best for me. If you have new gears or gears with a dark finish the yellow coloured compound works well, but if you have used gears or gears with a silver or metallic finish, you may have more success with the blue coloured marking compound – a popular brand is “Prussian Blue” made by Permatex. 3. Make sure the carrier is fully seated and the bearing caps are installed finger-tight. THIS NEXT STEP IS THE MOST OFTEN IGNORED STEP - AND THE #1 REASON PEOPLE HAVE TROUBLE READING THE CONTACT PATTERN In order to produce a clear, readable contact pattern you must apply a load on the gears when you rotate them. You need to apply a load so that it takes 40-50 ft-lbs of torque to rotate pinion. You can use a pry bar, forearm, heavy rags, a block of wood wedged between ring gear and inside of housing, or any similar method to apply drag to ring-gear so that it takes 40-50 ft-lbs of torque to rotate the pinion. However, by far the best method I have found is to temporarily reinstall the axle shafts, and then use the brakes to apply the load. If you have a helper, you can have them hold the brakes on slightly while you use a torque wrench on the pinion nut to turn the pinion and check that the correct load is being applied. If you have a parking brake on the rear wheels, you could lightly apply it to create the load. If you have drum brakes and no helper, you could temporarily adjust the rear shoes so that they contact the drums enough to supply the required load. If you have them, you could also use cutting brakes just slightly applied (this is the method I used). Finally, if none of that works for you, you could try re-installing the wheels and jacking them up to a point where they just contact enough of the ground to provide the load required. 4. Apply drag to ring-gear so that it takes 40-50 ft-lbs of torque to rotate pinion. A buddy would be helpful at this stage, but it seems as if mine had drunk all my beer and left! 5. With this drag load in place, rotate the pinion two or three times in each direction through the marking compound. 6. Because we have previously set backlash to spec, at this stage we are concerned only with the position of the pattern between the top and root of the teeth. Observe and record whether the pattern is towards the top or root of the ring-gear teeth. You can use either the drive- or the coast-side pattern as the indication of pinion depth is the same on either side. In the case of used gears it is sometimes easier to read the coast-side pattern due to wear on the gear teeth. 7. After recording the pattern result you will have to remove the carrier and pinion, remove the inner pinion-bearing cup from the housing, adjust the inner-pinion shim stack, reinstall pinion and re-set pinion-bearing preload, reinstall carrier, re-check and adjust backlash if necessary, re-coat ring-gear teeth with marking compound, and finally obtain and interpret another contact pattern. At this point it should be painfully obvious that a lot of patience is required. Pinion depth should be adjusted as follows:
Fine-tuning Overall Contact PatternBy the time you have adjusted the pinion depth to centre the pattern between top and root, and if you have held backlash to within spec you should have an acceptable overall contact pattern. Ultimately you are aiming for a pattern that is centred between the heel and toe and also between the top and root of the tooth. There should be some clearance between the pattern and the top of the tooth. On the coast-side the pattern may be slightly towards the toe. The pattern should also be broad and diffuse, without sharp edges. Figures 29 and 30 illustrate an acceptable pattern. |
||||||||||||||||||||||||||||||||||||||||||||||||||||||||||||||||||||||||||||||||||||||||||||||||||||||||||||||||
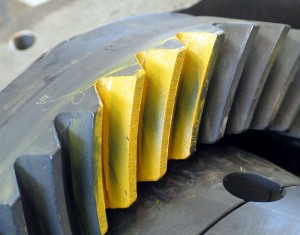 |
Figure 29 – Acceptable drive pattern. Pattern is centred between top and root and between heel and toe with diffuse edges. Note the thin strip of yellow compound indicating the required clearance between pattern and top of tooth |
|||||||||||||||||||||||||||||||||||||||||||||||||||||||||||||||||||||||||||||||||||||||||||||||||||||||||||||||
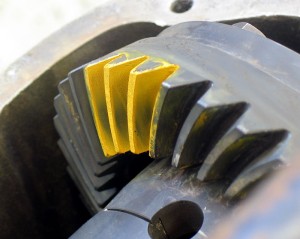 |
Fig 30 – Acceptable coast pattern. Pattern is centred between top and root and is slightly towards the toe. There is clearance between pattern and top of tooth and pattern is broad with diffuse edges |
|||||||||||||||||||||||||||||||||||||||||||||||||||||||||||||||||||||||||||||||||||||||||||||||||||||||||||||||
If, however, you are not satisfied with the location of the pattern between the heel and toe, you may be able to fine-tune the pattern further by adjusting backlash slightly while keeping it within the acceptable range (Figure 28). Table 1 summarizes the possible adjustments. Keep in mind that adjusting backlash will also affect pinion depth so that you may have to make further fine adjustments to the inner pinion shim stack while you home in on the perfect settings.
Final AssemblyOnce you have achieved an acceptable pattern with backlash and pinion preload in spec it’s time for final assembly. If all goes well, you should simply have to replace the set-up bearings with the new bearings and button everything up. However – realize that the stack height of the new bearings may not be exactly the same as the old set-up bearings and it’s possible, though unlikely, that further adjustments may yet be required.
Break InIt is absolutely essential that all new gear-sets are properly broken in before being heavily loaded (towing, constant use, high load or rpm). During the break-in period the gears settle-in and often small metal particles or phosphorous coating can be sloughed off. The goal is to have the gears settle-in and then change the oil and remove any particles before heavily loading the gears. Break in new gears as follows:
ShortcutsThere is of course more than one method that can be used to set up gears. The method that I have detailed here is a particularly thorough approach, designed to achieve success regardless of starting point or parts used. It can, however, be slow and laborious. In my case, I started with a brand-new locker, brand-new 4.10 Dana 60 gears, and an old Chevy front Dana 60 housing. My results:
Though I started from the old shim stacks for carrier-bearings, I did trial the “screwdriver and dial-indicator” method of determining carrier shim requirement and came up with 0.064 RGS / 0.025 NRGS, which would have worked quite well as a starting point. There are a couple of shortcuts possible that you may wish to use to speed things up.
|
||||||||||||||||||||||||||||||||||||||||||||||||||||||||||||||||||||||||||||||||||||||||||||||||||||||||||||||||
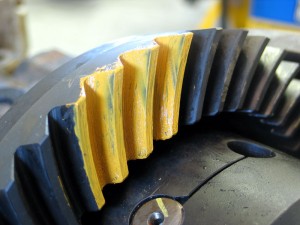 |
Figure 31 – Drive-side contact pattern - top / heel. The dark area on the yellow is where the pinion and ring-gear have come into contact, removing the marking compound from the teeth and illustrating the contact pattern. In this case, it is on the drive-side of the ring-gear teeth and is clearly towards the top and at the heel of the teeth, illustrating that the pinion depth is way too shallow | |||||||||||||||||||||||||||||||||||||||||||||||||||||||||||||||||||||||||||||||||||||||||||||||||||||||||||||||
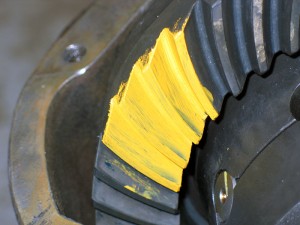 |
Figure 32 – Coast-side contact pattern - top / toe. Dark area illustrates contact pattern on coast-side is at the top and towards the toe of the teeth. Pinion depth must be significantly increased and backlash set to spec | |||||||||||||||||||||||||||||||||||||||||||||||||||||||||||||||||||||||||||||||||||||||||||||||||||||||||||||||
I promised you a funny story – that is, assuming you find tales of my mind-numbing stupidity amusing! When I pulled my original gears I found they were chipped and pitted and in no shape to be reused. No problem, I thought – I know I have a good used set of 4.10s around here somewhere (rummaging around shop) – ah-ha here they are! So I happily proceeded to assemble and photograph everything. That is – until the first time I tried to drop the carrier in the housing with the pinion installed. "Hang on, something’s not right here at all", I thought. The carrier just wouldn’t go in. Oh nooooooo, it suddenly dawned on me. I never even thought to check before, but here I was, everything torn apart and short on time, trying to cram reverse-spiral gears into a regular, low-pinion housing. It doesn’t work! Luckily for me, Ted from Peak Empire Extreme Offroad responded to my urgent cry for help and stepped up to save my butt. He patiently listened to my pitiful story, somehow managed to avoid laughing in my face, and had exactly what I needed shipped to me, across international borders, within a couple of days. My thanks to Ted and a hearty recommendation that you check out Peak Empire for your future drivetrain needs – great people and great service! There’s still more gear tech I’d like to cover so stay tuned for future articles where I will discuss reverse spiral vs. regular-cut gears, competition set-up, compensating for backlash change under torque, and an advanced method of interpreting contact pattern based on whether the gears are hobbed or milled. Until then, good luck in your gearing ventures and keep your nuts tight!
Acknowledgements:An article of this scope cannot possibly be written alone. I am thankful to the following friends and colleagues for there invaluable help: Lonny Handwork |
||||||||||||||||||||||||||||||||||||||||||||||||||||||||||||||||||||||||||||||||||||||||||||||||||||||||||||||||
|
||||||||||||||||||||||||||||||||||||||||||||||||||||||||||||||||||||||||||||||||||||||||||||||||||||||||||||||||
Sources: Peak Empire Extreme Offroad Inc. 87 Hurricane Shoals Rd. |
|
